
2648-20 dust connection: identify the parts
An exploded tool-port, adapter and hose chain is separated from the alternative dust box; the extender is shown below.
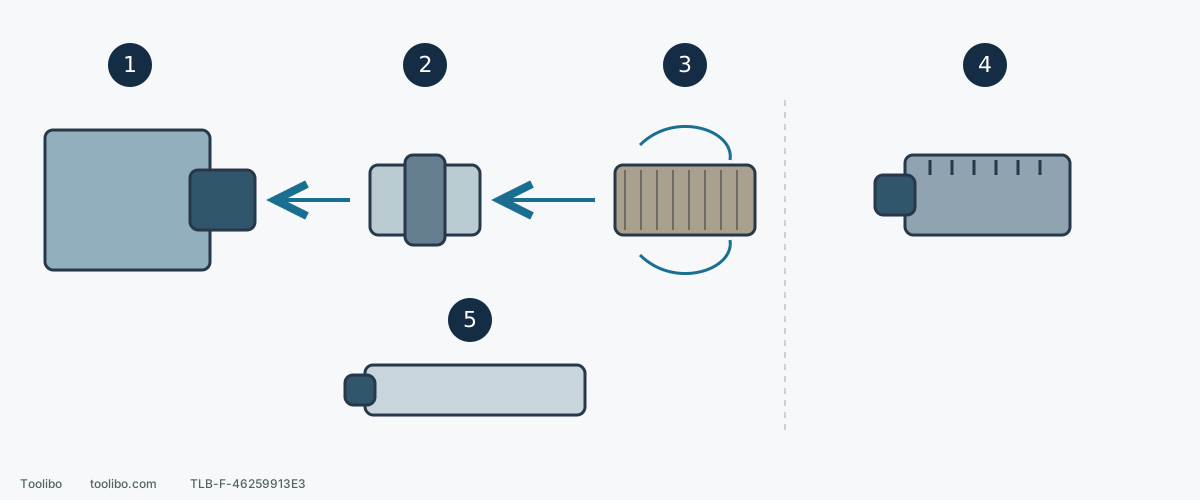
1. Tool dust port
Remove the battery and dust box; inspect the mating surfaces.
2. Hose adapter
Slide into the port and push firmly; do not invent a threaded tool-side fitting.
3. Compatible hose
Twist hose and adapter together to secure. Disconnect the hose first during removal.
4. Alternative dust box
Refit the complete box with vents up whenever no vacuum is connected.
5. Extender
Adds required length or specified battery clearance; it does not make an arbitrary hose compatible.
Part shapes are symbolic, not a fit template. Curves indicate twisting without specifying a handed direction; remove the battery before assembly.
Identify the three parts
The dust box collects and filters dust. The universal hose adapter connects the tool port to a vacuum hose. The extender supplies extra connection length. Added length does not change the hose diameter or make every hose compatible. An appropriate extender also provides clearance when a larger M18 battery is used with the dust box.
These instructions concern the matching 2648-20 accessories, not similar-looking parts from the 2649-20 or another Milwaukee tool. Check explicit tool and accessory compatibility when buying replacements. The word universal alone does not establish a secure fit for an arbitrary hose end.
Connect in this order
- Switch off, wait for the pad to stop and remove the battery. Hold the tool and dust box and pull them apart along their connection. Do not pull on the box lid to remove the assembly.
- Inspect the port and mating surfaces, removing loose debris that obstructs insertion. Address cracks, distortion or obvious wear; do not fill a loose joint with layers of tape.
- Slide the hose adapter into the sander port and push tool and adapter firmly together. This is insertion and seating, not threading the adapter into an imagined screw fitting on the tool.
- Connect a compatible vacuum hose and twist hose and adapter together to secure them. This step specifies no universal clockwise direction, turn count or clicking latch. Do not chase a completion signal the connection does not provide or force it with pliers.
- Use the appropriate extender when additional length is needed, then check the complete arrangement again. Do not chain unidentified fittings merely to reach a hose.
Check that it is seated, not merely resting on the port
Keep the battery out. Support both sides of each connection and check gently during normal handling and movement. The joint should stay seated without obvious skew, looseness or withdrawal as the hose moves. Look for trapped debris, cracks and abnormal gaps. No universal insertion-depth or pull-force figure is supplied here; do not hang the tool from the connection to test its strength.
A fitted adapter does not establish a suitable dust system. The vacuum, filtration and consumables must suit the material, and abrasive holes and passages must remain open. Assess unknown old coatings first. Secure mechanical fit cannot replace material-specific protection.
Rehearse the actual travel
Still disconnected, place the pad on secured work and travel through the start, farthest point and return. Check battery clearance against the intended pack’s external dimensions while keeping the pack removed. Check clamp collisions and surplus hose falling beneath the abrasive. Extra length can also increase interference with a frame or side pull, so a joint that stays together in your hands is not the whole test.
If the hose tilts the adapter at full reach, move the vacuum, reroute the hose or change work orientation instead of pressing the tool down harder. Once static fit and travel are satisfactory, confirm the switch is OFF and securely refit the compatible battery, then make a short trial on safe material using the model’s sequence. Stop for visible leakage at a joint, detachment or impaired control; wait for motion to stop and remove the battery before inspecting.
Remove and restore the dust box
After stopping, waiting and removing the battery, disconnect the hose from the adapter first. Then grasp the sander and adapter and pull them apart. Do not drag the entire hose to extract the tool-side fitting and lever against the plastic port.
When no vacuum is connected, reinstall the complete dust box assembly rather than operating with an open port. Keep its vents facing up and push the assembly firmly together. Use the matching extender for the larger-battery arrangement as specified for the tool, then recheck clearance against the intended battery dimensions without connecting power for that check. Follow the box cleaning procedure; do not wash its filter with water or compressed air.
Models referenced