
Match the interface, material and diameter separately
Three-jaw chuck holds a smooth shank; a red cross separates a slotted shank. A brick and two diameter circles show the material and capacity checks.
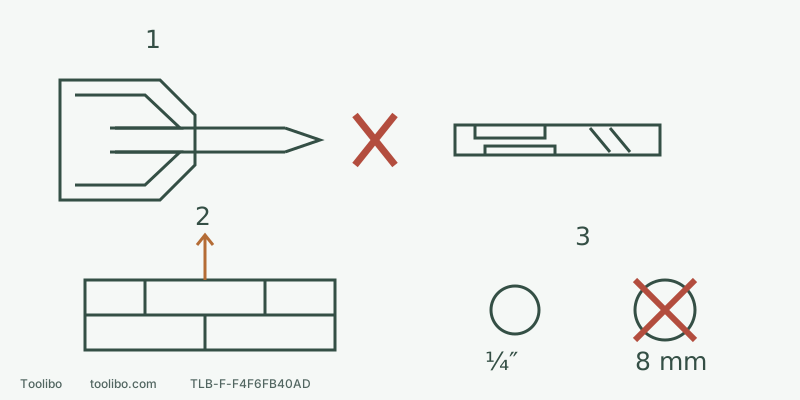
1 · Correct shank, not a forced fit
HCBG06T is specified for a three-jaw chuck. Do not substitute an SDS slotted shank of the same cutting diameter.
2 · Identified brick sample
Material approval does not resolve hidden services, dust control or structural-anchor requirements.
3 · Reject a larger hole under this limit
The listed masonry limit is 1/4 inch (6.4 mm); 8 mm is outside it, regardless of the chuck opening.
Conceptual geometry, not an SDS dimensional drawing or a tested installation. The diameter rejection is specific to the stated DCD805 US manual.
Identify the shank before the cutting tip
A conventional three-jaw chuck grips a suitable shank between three jaws. SDS-plus and SDS-max use their respective slotted shanks and dedicated retention systems. A carbide tip describes part of the cutting end, not where the other end belongs.
Swipe or scroll horizontally to see all columns.
| Accessory in your hand | Next check | What not to do |
|---|---|---|
| Cylindrical masonry bit explicitly intended for three-jaw chucks | Clamping range, percussion rating and material | Skip drilling capacity because it fits |
| Hex-shank masonry accessory | Exact tool and action approved for that model | Treat every hex shank as impact-driver approval |
| SDS-plus or SDS-max shank | Matching rotary-hammer system and application | Clamp its slots in three jaws or equate the two SDS systems |
An impact driver’s rotational impacts are also different from a hammer drill’s axial blows. The word “impact” cannot replace the accessory specification. This guide does not use adapters to combine incompatible systems.
One combination with identifiable model numbers
Take the US DCD805 Type 1 covered by manual NA229093 05/22, and plan a 1/4-inch hole in an identified brick test piece that can be secured. This is not a building-wall or load-bearing-anchor design. The accessory is Bosch BlueGranite Turbo HCBG06T, product number 2610045808: a 1/4-inch diameter, 6-inch overall-length carbide hammer-drill bit. Its page specifies a three-jaw-chuck interface and brick/masonry applications.
Work through the selection in this order:
- Inspect packaging or the shank only with safe, stable equipment. Do not approach or handle a smoking, leaking, swollen or abnormally hot battery to identify it; stop use and contact the manufacturer. The tool must be the hammer-capable DCD805, not a DCD800. The latter’s drilling position does not create hammer action.
- The bit is that exact HCBG06T, not merely something in the BlueGranite family or an SDS bit of the same diameter. Check its packaging and actual shank.
- This DCD805 manual gives a maximum masonry carbide-bit diameter of 1/4 inch, with 6.4 mm in parentheses. The selected diameter falls within that limit. A 1/2-inch chuck does not authorize a 1/2-inch masonry hole.
- The material must satisfy both products’ applications. An identified brick sample does not make an unknown wall, tile surface, reinforcing bar or stone acceptable.
- Finally, check planned depth against usable flutes, proper clamping and withdrawal clearance. Six inches is overall length, not permission to drill six inches deep or ignore chip clearance.
This is a document-supported selection example, not a completed hands-on test. Battery suitability, tool condition, secure support, dust controls and site risks remain prerequisites.
Arrange the settings after choosing the combination
If the battery is smoking, leaking, swollen or abnormally hot, do not approach or handle it to read a label; stop using it and contact the manufacturer. For a normal, undamaged tool, release the trigger, wait for a complete stop, move the direction selector to its centre lock and remove the battery before fitting the bit by this tool’s chuck procedure. Grip the appropriate shank, not the flutes.
With power isolated, turn the mode collar to the hammer symbol and fully engage the mechanical range suitable for the task. Positions 1–15 are screwdriving clutch settings, not masonry-drilling force limits. Secure the test piece and complete the material/dust assessment and suitable collection and protection arrangements; “just one hole” is not an exemption.
Keep your finger away from the trigger while fitting the specified battery and checking its latch, then unlock the selector and choose forward rotation. Hold the tool securely, align the bit with the hole axis and follow the DCD805 hammerdrilling instructions, using only enough pressure to control excessive bouncing. More force is not necessarily faster. If the tool slows markedly, the bit binds, the material behaves unexpectedly or dust control fails, release the trigger, wait for the stop and isolate power before investigating. Do not push sideways to enlarge the hole or repeatedly trigger through a jam.
Changes that require a new selection
Changing the hole to 8 mm exceeds the masonry limit in this manual; availability of that size in the accessory family does not change it. Changing the brick sample to a tiled wall also invalidates the simple example: layers and hidden objects need separate assessment. For a load-bearing anchor, diameter, depth, cleaning and acceptance belong to the exact anchoring system; this example establishes no load rating.
If all you know is that it “looks like a brick wall”, first use the hidden-services check and the material and dust assessment. Selecting a bit does not authorize the hole location.
Models referenced