
Size, direction and condition are separate checks
The loop shows whole-loop length, not contact length. Matching arrows are relational, not a real mounting orientation; the damaged seam is a stop example.
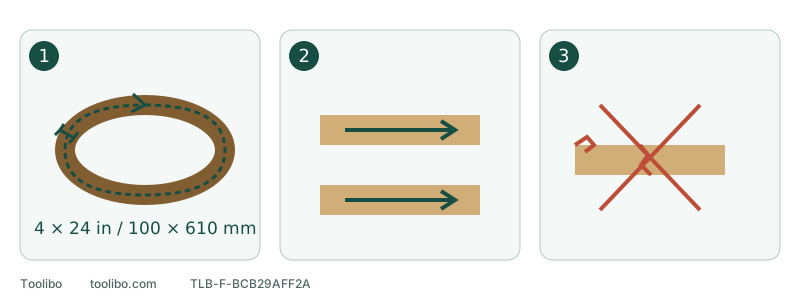
1. Complete belt size
Keep width and circumference together in the purchasing specification.
2. Compare actual arrows
Check belt and tool markings while unplugged.
3. Reject damage
Do not run a torn or separating belt to flatten or repair it.
The loop shows whole-loop length, not contact length. Matching arrows are relational, not a real mounting orientation; the damaged seam is a stop example.
Both dimensions matter
9403 takes a 4 × 24-inch belt, also specified as 100 × 610 mm. These are corresponding nominal imperial and metric descriptions, not a reason to invent another fit category from small conversion differences.
The first dimension is width; the second is the length around the complete loop. The short flat area touching the work is not loop length. Measuring only one face of a flattened old belt is not a reliable substitute for reading the full product specification and model applicability.
Swipe or scroll horizontally to see all columns.
| Product information or observation | Is it sufficient for choosing a 9403 belt? |
|---|---|
| Complete 4 × 24-inch or corresponding 100 × 610 mm marking, with clear application and model suitability | Continue checking abrasive, direction and condition; this is not full acceptance |
| Only “four-inch belt” | No: whole-loop length is missing |
| Same width, different loop length | Width alone cannot establish suitability |
| “For Makita” without the exact model | No: models within one brand need not share belt size |
| Size guessed from the contact patch or a flattened old loop | Return to complete product identification instead |
9403 and 9921 appear in the same related manual, but they do not use the same belt width. Read the 9403 column rather than transferring consumables because both models appear on the cover.
Check application and condition next
Read the abrasive’s permitted work materials, complete grade marking and intended stage. Rough preparation of known solid wood does not authorize the same belt on an unknown old coating. A “for coatings” description is not a hazardous-material assessment. For veneer, unknown thickness allowance or precise flattening, decide whether belt sanding is appropriate before buying the coarsest grade.
Keep brand, series, grade, full size and application information for repeat purchases or support. Do not fill missing identification on loose belts by colour, feel or a seller’s assurance that they are nearly the same.
Inspect the loop: no torn or badly frayed edges, visible seam opening or delamination, or severe folds. Replace damaged consumables rather than running them to flatten a packaging crease. Do not trim, splice, stretch or glue an unsuitable loop into service.
Compare two arrows, not a guessed clockwise direction
With the tool switched off, belt fully stopped and plug disconnected, compare the direction mark on the back of the belt with the arrow on the tool. For 9403 they must correspond to the same travel direction. Use actual markings, not “left” or “right” copied from a photograph taken from another angle.
The appearance of the overlapped seam does not replace the direction arrow, nor does another sander’s rotation establish this one’s direction. If markings are worn or unclear, or a claimed bidirectional product lacks explicit applicability, confirm with the abrasive manufacturer or tool support first. Do not assume the check can be skipped.
This establishes belt identity and orientation, not roller location or internal drive direction. The diagram’s matching arrows show a relationship, not the physical fitting direction for your machine.
Where selection ends and installation begins
After confirming full size, application, condition and direction, use the complete matching installation instructions to identify the tension lever, rollers and proper seating. A loop illustration is not a lever-location drawing; no unverified force or clearance value is supplied here.
Keep the tool unplugged. If the correct belt will not seat, the tension mechanism behaves abnormally or there is external damage, stop and resolve fit or service first. Never power the machine to pull a partly fitted belt into place or hold it near the rollers to help it travel.
Correct direction does not establish correct tracking
Tracking inspection and adjustment are separate. 9403 tracking uses the designated adjusting knob while the belt runs, not a live tension release or hand contact with the belt. Learn and follow the exact applicable procedure before doing it. Correct width and matching arrows are only earlier prerequisites.
If the belt rubs the frame, begins fraying or will not track steadily, stop and safely isolate power before addressing it. Do not keep consuming belts in repeated trials. Give support the complete 9403 identity, belt packaging and existing observations; do not reproduce rubbing for a video.
A useful purchasing record identifies the complete belt, material and process, direction check and exact machine instructions for installation and running adjustment. That is more reliable than simply ordering a pack of four-inch belts.
Models referenced