
A seated fitting is different from a buried or spinning screw
Three cross-sections compare an evenly seated fitting, a crushed surface around an overtightened screw and an enlarged hole with poor thread engagement.
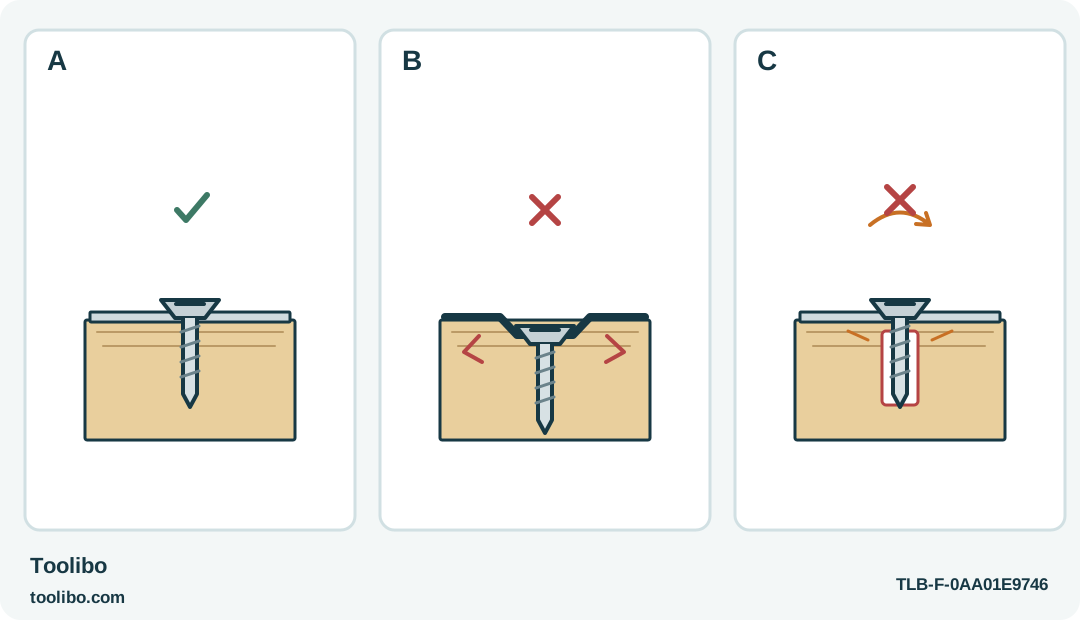
A · Even seat
An even seat follows the fitting instructions; a visible head is not automatically loose.
B · Crushed surface: stop
A depressed or cracked surface means the joint has already been damaged; stop tightening.
C · Lost grip: investigate
A turning screw without grip needs investigation of the fastening, not a longer motor run.
Conceptual outcomes, not load ratings or repair dimensions. The furniture maker defines the required seating condition.
Define finished before you start
A screw is not correctly seated just because the driver stops. Nor is it necessarily loose because its head remains visible. The required endpoint depends on the fitting: a head may rest on a bracket, sit in a shaped recess or remain at a specified adjustment position. Check the furniture instructions and identify that endpoint before applying power.
Choose an ordinary, non-structural assembly for this method. Follow any instruction to use hand tools or a specified tightening procedure. A small powered driver is not a substitute for an exact assembly requirement, and this guide does not establish fastening strength for chairs, wall supports or children’s furniture.
Lay the components out so the matching screws can be distinguished by length and type. Look at both faces of a loose panel where possible. You should know where the screw is intended to go, not discover its length when it breaks through the finished face.
Make the joint hold its own alignment
Support the parts on a stable surface and protect the finish. Align the fitting and hole before driving. If the parts spring apart, the holes do not line up or a layer of material is trapped underneath, resolve that problem first. A powered screw should not be used as a clamp to drag a doubtful assembly into shape.
Start the screw carefully by hand when the fitting permits it. The initial turns are a useful check: the screw should follow its intended path without being forced sideways. Stop if it binds immediately. Recheck the screw and hole rather than assuming the motor will make the difficult first turn easier.
Fit a sound bit to both tool and screw, following the tool’s unpowered accessory procedure. Wear suitable eye protection and keep your supporting hand away from the screw’s possible path. If you cannot maintain a straight approach, reposition the work or use an appropriate hand tool.
Establish control on a matching sample
For tools with adjustable torque or a clutch, begin cautiously rather than at maximum. The WX240L has three torque selections. The DF012D and Milwaukee 2101-20 have numbered clutch settings, but their numbers do not represent interchangeable settings across brands.
Use matching scrap to establish a starting arrangement when the project allows a meaningful trial. Keep the screw, material and fitting relationship the same. A result obtained in dense scrap does not guarantee a delicate veneered panel will tolerate it.
Keep the DF012D in gear 1, the low-speed range, for this clutch-controlled method; do not choose its drill-symbol position, which bypasses the clutch. Use the Milwaukee in low speed too. Its recommended practical wood-fastening limit is a number-six wood screw with a full pilot hole, not an M6 machine screw. Stay within that limit when selecting a trial or joint for the M4. A gear change is a reason to reconsider the setup, not merely a way to finish the remaining screws faster.
Approach the seat in observable stages
- Engage the bit fully and confirm that the fitting lies flat before starting.
- Drive briefly while the head remains away from its final seat. Release the control and inspect the alignment.
- Continue cautiously, reducing the amount of travel between inspections as the head approaches the fitting.
- Stop at the specified seating condition or when the clutch stops the tool. Release the switch rather than holding it against a stopped fastener.
- Inspect the fitting, recess and surrounding surface before moving to the next screw. Complete any specified hand-finishing step with the correct hand tool.
Avoid judging the result solely by a change in motor sound. A harder sound might mean the screw has seated, but it might also indicate a blocked hole or an incorrect fastener. Inspection separates those possibilities without asking the tool to decide for you.
Read three common outcomes correctly
A head that remains proud with the fitting still loose needs investigation before more torque. Check whether the screw is the correct length, whether the parts are aligned and whether the hole is suitable. Do not conceal a visible gap by burying the head harder into one side of the fitting.
A screw that rotates without tightening may have lost its grip. Stop instead of letting it spin. An enlarged or damaged hole requires an appropriate repair decision; adding a longer screw without checking the construction can create a new hazard on the opposite face.
A depressed or cracked surface indicates that the joint has already been damaged, even if the fitting now feels tight. Repeated tightening will not restore the material. Remove the item from use where the damage affects its function, and follow the furniture maker’s repair or replacement advice.
Check the whole fitting after the last screw
Inspect all fasteners together. A fitting pulled down unevenly can distort while each screw appears individually seated. Check the intended movement or alignment of the assembled part without using it as a load test.
Keep the successful screw and tool settings recorded with the project details. Treat that record as a starting point only for genuinely matching joints. The best habit is to recognize the finished condition each time, rather than teach your hand to keep pressing until the driver can no longer turn.
Models referenced