
Verify the tip and the shank separately
Three separate close-ups show tip engagement at a screw recess, shank retention at a generic holder, and a straight stopped approach inside a supported recess.
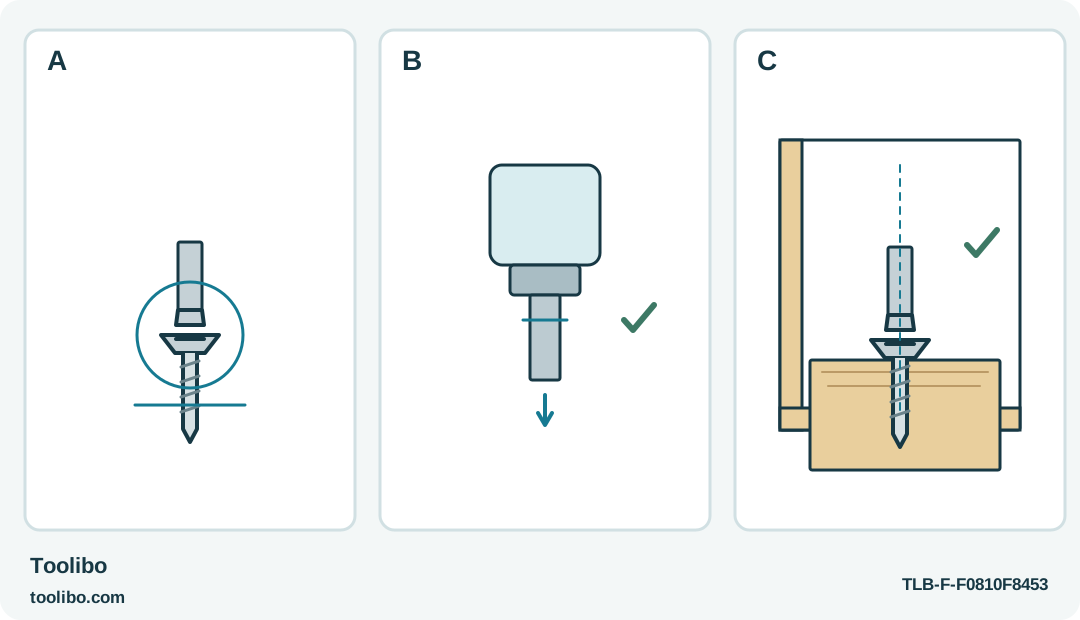
A · Match the recess
Check the correct tip shape, size and condition against the actual screw recess with the motor stopped.
B · Match the holder
Check the shank and retention method against the exact tool; appearance alone does not establish compatibility.
C · Rehearse straight access
Rehearse a straight approach and withdrawal with the work supported and the start control untouched.
Conceptual fit checks; the picture does not claim one shank geometry fits every compact driver. Use the actual tool and fastener requirements.
Treat the two ends of the bit as two separate choices
A bit has to fit the screw at one end and the driver at the other. Finding the right tip does not prove that the shank is compatible with the tool’s holder. Likewise, a bit that locks securely into the driver may still be the wrong size or shape for the screw. Check both connections before using power.
Start with an accessible screw from the actual job, not a similar fastener found in a drawer. Keep the fastening instructions nearby, particularly when a furniture kit contains several connector types. A cam fitting, a slotted adjustment screw and an ordinary assembly screw can require different handling even when the same bit can enter their recesses.
This procedure is for ordinary, non-electrical fastening. It is not a method for finding out whether a screw belongs to live equipment or an unknown wall fitting. Keep the tool away from potentially energized parts and use appropriate eye protection for the job.
Inspect the screw recess and bit tip
Put the motor control in its safe stopped condition. Remove the battery where the tool allows it; on an integrated-battery tool, disconnect charging equipment and keep the start control untouched. Examine the screw head under good light before trying different tips.
A useful bit should enter the intended recess fully without being forced. Check it gently by hand. A tip that rests high on the edges, has obvious side play or cannot settle into the recess should not be tested with the motor. Look at the bit itself for rounded corners, cracks or a damaged point. Worn tips can make a correctly identified size behave badly.
Do not assume all cross-shaped recesses take the same bit, and do not force the closest-looking tip because it came in the driver box. Use the fastener’s specified bit type when available. If the recess is already rounded or packed with material that cannot be removed safely while the work is unpowered, stop and choose an appropriate repair approach instead of using the driver as a cleaning tool.
Check the holder’s requirements
The SD561201 uses a retaining sleeve around its quarter-inch hex collet. Keep the motor-starting selector untouched while moving the sleeve backwards, inserting the bit and releasing it. Verify that the bit is firmly held before bringing it to the work.
The DF012D instructions specify a particular driver-bit shank arrangement. Follow that illustration rather than treating “hex” as complete compatibility information. With the battery removed, insert the bit fully using the sleeve. A sleeve that does not return normally or a bit that pulls out is a failed retention check.
For the Milwaukee 2101-20, remove the battery before changing accessories and use the accessories recommended for that model. Do not transfer a holder procedure from another brand merely because the noses look alike. Magnetic retention, a sliding sleeve and a bit holder used with short insert bits are different arrangements.
Rehearse the approach with the motor stopped
- Support the workpiece so the screw will remain in the same position when light hand pressure is applied.
- Place the retained bit fully in the recess without touching the start control.
- Look along the tool from the side and above. The bit should remain on the screw’s axis, not lean around an obstruction.
- Check that your grip leaves room to start, stop and withdraw the tool without moving a hand near the rotating tip.
- Remove the bit from the screw and check that the work surface is still unmarked. Reposition the work if the tool body must rub against it.
This stopped rehearsal is especially helpful inside drawers and near cabinet sides. It reveals a clearance problem before the motor turns a small misalignment into a damaged recess. A longer bit or extension is not automatically the answer; any added accessory still needs model compatibility and secure retention.
Recognize slipping before it becomes damage
A secure bit does not expand the tool’s fastening range. For the SD561201, powered softwood work is limited to the listed self-tapping screws no larger than ST3.5; its listed steel-plate application requires threaded mounting holes and machine screws no larger than M6. Other unlisted screws are for manual, non-powered use. This bit-fit check does not authorize electrical work.
Begin the actual fastening cautiously using the tool and joint instructions. If the tip climbs out, chatters against the recess or leaves fresh marks, release the control immediately. Do not keep the motor running while trying to push the bit back into place.
Recheck three things separately: the tip’s fit, the holder’s retention and the approach angle. Replacing the bit will not correct an obstructed approach, and moving the work will not repair a rounded screw head. A damaged fastener may need replacement or a different removal method before the project can continue.
Put the successfully matched bit and spare screws together after the job. Labeling the actual bit type is more useful than remembering its color or its position in a mixed accessory box. The aim is not to find a tip that can make the screw turn once, but to preserve reliable engagement throughout installation and any later removal.
Models referenced