
Keep the screw axis straight and the fitting flat
A supported panel and small bracket are shown in section, with a straight bit above an evenly seated screw and a separate crossed-out tilted approach.
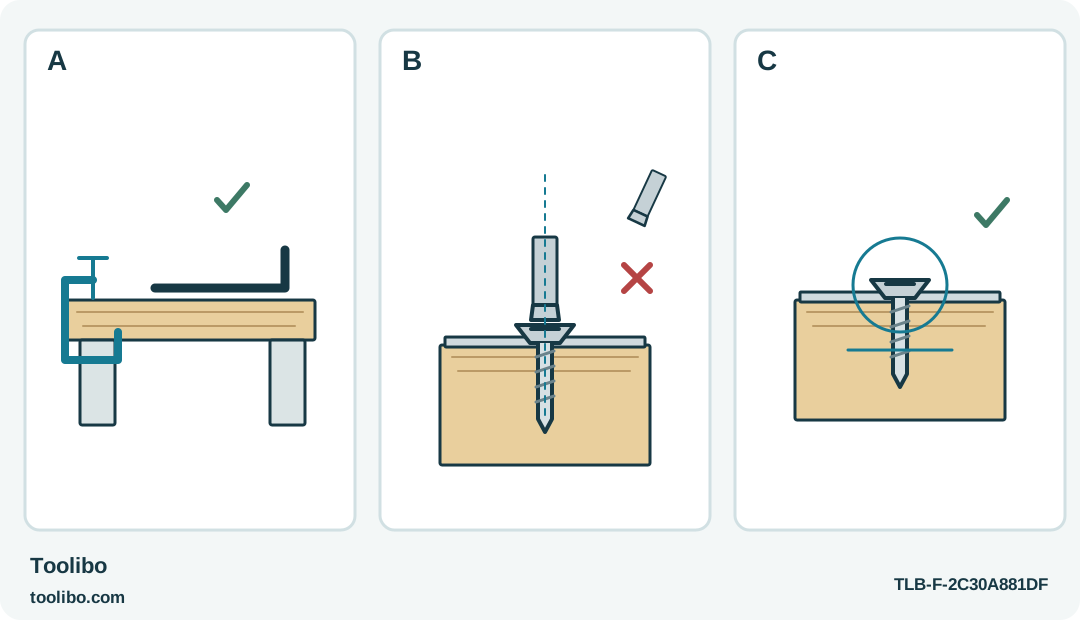
A · Support the joint
Support the panel and fitting before starting; do not use the screw to drag misaligned parts together.
B · Match the screw axis
Seat the correct retained bit fully and preserve the screw axis rather than leaning around an obstruction.
C · Stop at the seat
Stop at the furniture maker’s intended seat and inspect the finish instead of adding another powered burst.
Conceptual furniture joint, not a prescribed screw length or a structural fastening design. The correct screw and seating position come from the furniture instructions.
Choose a joint you can inspect
A small electric screwdriver is useful when a furniture kit has several ordinary screws to turn, but it cannot tell you whether the screw belongs in that hole. Before reaching for the WX240L, lay out the parts and identify the exact joint in the furniture instructions. Put different screw lengths in separate shallow containers. A screw that enters easily can still be long enough to emerge through the opposite face.
Wear suitable eye protection and keep bystanders away before beginning powered fastening. Keep loose clothing, hair and fingers clear of the rotating bit.
For this first job, choose an accessible, non-structural fitting on a supported workpiece: for example, a small fitting that the furniture maker explicitly specifies for screw assembly. Do not use a chair, a child’s bed, a wall-mounted support or another safety-critical item as a practice piece. Cam locks and unfamiliar connectors are not ordinary screws, even when their recess accepts a screwdriver bit. Use the furniture maker’s method for those connectors.
Place the parts on a stable surface with the finish protected. Support the joint so that driving a screw cannot make a panel tip or trap your fingers. Good access means you can see the screw head, hold the tool on the screw’s axis and stop without shifting the workpiece.
Fit the bit before touching the drive buttons
Disconnect the charging lead. Keep both drive buttons untouched while fitting the correct bit in the holder. Examine the recess on the actual screw rather than choosing a bit because it was supplied with the tool. A worn or undersized tip can feel acceptable until the motor starts, then climb out and mark the finish.
With the motor stopped, seat the tip fully and look along the tool from two directions. The shaft should continue the screw’s axis. If the tool must lean to clear an edge, change the workpiece position or use a suitable hand screwdriver. Extra pressure is not a substitute for straight access.
Keep a separate, correctly fitting hand screwdriver nearby. It is useful for starting a supplied screw gently and for any final hand adjustment required by the furniture instructions. It is not a reason to force a joint that has already begun to split or strip.
Establish a low-risk starting setting
The WX240L button selects three torque levels. The button changes torque levels; it is not a speed selector, and the levels are not calibrated furniture settings. Start at a low suitable level and make a trial on matching spare material when the kit provides it. A trial is especially valuable when the screw head bears on a thin finish or a soft fitting.
On the real joint, begin the screw carefully by hand where the fitting instructions permit. It should enter the intended hole without being driven sideways. If it meets resistance immediately, stop and check the screw, hole and alignment. Do not use the motor to pull two badly aligned parts into place.
Decide what a correctly seated screw will look like before driving it. The answer might be a head resting evenly on a bracket, not a head buried below the surrounding surface. That visible endpoint is more useful than counting motor turns.
Drive a little, inspect, then finish
- Hold the supported assembly steady without putting fingers in the screw path. Keep your hand clear of the rotating bit.
- Seat the tip completely, align the tool and select the required direction using the controls shown on your WX240L.
- Drive briefly, then release the control while the head is still clear of its seat. Check that the fitting remains flat and the screw is advancing normally.
- Continue cautiously toward the planned endpoint. Stop as soon as the fitting is seated; do not keep driving merely because the motor can turn.
- Inspect the surrounding finish, the fitting and the opposite face where visible. Follow any specified hand-finishing method rather than adding another powered burst by habit.
If the tool stops early, inspect the joint before considering a higher torque level. A mismatched screw, trapped component or damaged hole will not be corrected by more torque. If the bit slips, release the button immediately and examine both tip and recess. Replace a damaged bit; stop the assembly if the fastener can no longer be engaged reliably.
Check the assembly rather than the motor
After all specified fasteners are fitted, check the item as its instructions require. A bracket should not twist under a gentle inspection, and moving parts should operate without scraping or catching. A loose screw that spins without tightening indicates a damaged or unsuitable fastening arrangement, not a need for a longer run of the screwdriver.
Disconnect charging equipment before using or putting away the tool. Wipe the exterior with a dry cloth and store it dry; do not add oil, liquid cleaner or improvised internal repairs. Keep the screw and bit labels with the remaining kit parts. Next time, those simple records will save more trouble than remembering which of the three torque lights happened to be on.
Models referenced