
Clean only visible cold deposits on isolated contacts
A fully isolated assembly and two separate enlarged external contact deposits with cotton swabs show the limited cold cleaning scope.
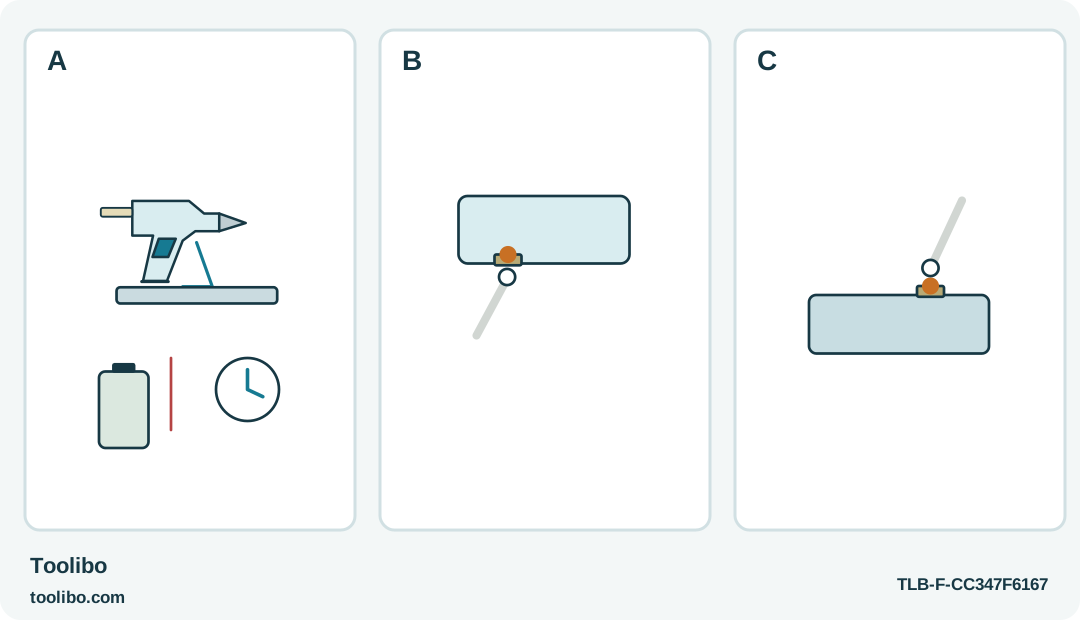
A
Switch the base off, cool completely, then remove its battery before touching either accessible contact area.
B
Use only the permitted cotton swab or nonmetal utensil gently on visible cold residue at the gun’s exterior contact area.
C
Inspect and clean the base’s accessible side too, without liquids, metal tools or housing access. Persistent connection trouble needs service.
Both mating contact areas deserve a cold visual check, but only visible residue is within the cleaning task.
Decide whether the contacts are the problem
A Ryobi P306 that does not connect consistently to its base may have visible glue residue on the accessible contacts. Cleaning that cold residue is a limited maintenance task, not permission to diagnose the heater or battery internally. First distinguish an obstruction you can actually see from a fault you are merely guessing about. A broken contact, scorched housing, liquid exposure or loose component is a reason to stop and seek service.
The base light and gun light have different meanings. With normal operation, the base light shows the switched-on base has battery power, while the gun light shows the gun is connected to the base. These are not temperature-ready indicators. A glowing base alone does not establish that the gun is heating, and a delayed flow of adhesive is not proof that the contacts need scraping.
If the gun had been operating normally and has simply cooled during use, return it to the base for reheating. Do not interrupt a normal heating cycle to clean hot contacts. This guide concerns accessible, fully cold deposits after a session, with the battery removed.
Isolate and cool before touching the base
Place the gun in its base, switch the base off and allow the entire assembly to cool completely in a protected area. The nozzle can remain dangerously hot after power is removed. Do not touch it to decide whether cleaning can begin. Maintain the same guarded cooling space you would use after ordinary work, with no loose paper or tools beside the hot end.
- Wait for complete cooling before handling the contact areas. A storage minimum is not a substitute for actual cooling under the conditions of the session.
- Remove the battery from the cooled base according to its instructions. Keep the battery separate from the cleaning area.
- Lift the cold gun out of the base and inspect both sets of accessible contacts in good light.
- Look for a discrete glue deposit rather than treating every mark or change in surface color as removable dirt.
Do not run a powered test while holding a swab against the contacts. Do not bridge contacts with a tool, add liquid to improve conductivity or use a metal probe to see whether a spring contact moves. Those actions turn a simple cleaning job into an electrical or mechanical intervention.
Remove only accessible cold residue
The P306 maintenance instructions permit a cotton swab or a nonmetal utensil to remove cold glue residue from the contacts on both the gun and base. The illustrated approach is to the exposed contact areas, not through an opening in the housing. Choose an implement that can reach the deposit without bending surrounding parts or leaving loose debris behind.
Work gently on the visible residue. Support the cold component so it cannot roll and keep the tool away from the nozzle. A metal screwdriver, knife, wire brush or abrasive pad is not an equivalent substitute. Never scrape the contacts with a metal object. Do not sand away the contact surface or attempt to restore its shape.
Keep solvents and wet cleaning methods out of this procedure. If a deposit cannot be lifted without force, stop rather than widening access by taking the unit apart. Remove loose swab fibers or detached crumbs from the accessible area without pushing them into the housing. Finish by looking at both mating sides again; cleaning only the base can leave an obstruction on the gun.
Reassemble and check without escalating the repair
With cleaning finished and the exposed areas dry and clear, seat the gun correctly in the base. Reinstall the recommended battery following its instructions, then switch on from a normal operating position. Observe whether the base and gun lights behave as expected. Do not repeatedly lift and drop the gun to make an intermittent connection; proper seating should not require impact or hand pressure throughout heating.
Allow normal heating and test flow on supported scrap before returning to the project. If the lights are normal but the adhesive does not flow, do not assume more contact cleaning is the answer. Check only ordinary external matters such as the specified stick, the heating interval and secure seating. Never force the trigger to diagnose the heater.
A continued connection problem, unusual heat outside the intended hot area, damaged contact, odor suggesting damage or failure to heat after normal setup belongs with qualified service. Switch off, allow complete cooling and remove the battery before storage or transport. Record the model and the external observations for the service request; describing which light appeared is more useful than claiming an internal component has failed.
For the next session, keep the return path clear and prevent loose adhesive from accumulating around the base. A clean protected bench and deliberate seating reduce avoidable contamination without adding a new maintenance ritual. Inspect when cold, clean only what is accessible and stop at the housing boundary.
Models referenced