
A decorative band must leave the lid free
A small supported ribbon contact, a relaxed box band clear of the lifting lid and an underside trial check show decorative rather than functional fastening.
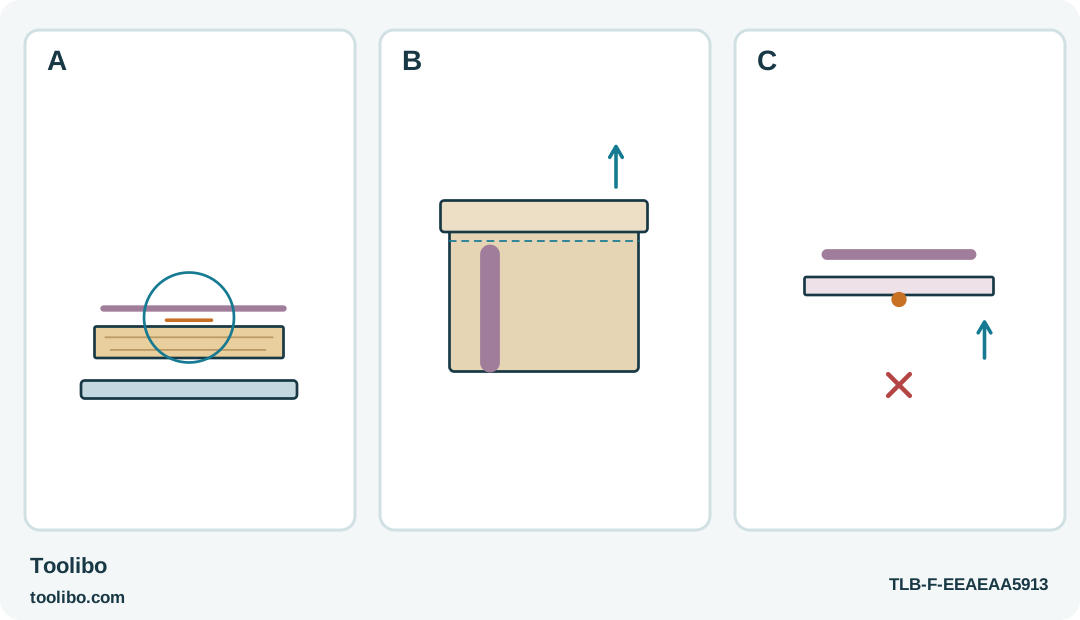
A
Trial a small hidden contact on supported actual ribbon and card using a compatible 930 low-temperature adhesive; keep fingers off the fresh bead.
B
Dry-fit a relaxed band on the empty box and keep the lid’s opening path clear. The ribbon is never a carrying handle.
C
Inspect the cold front and underside for staining, penetration or a lump. Reject unsuitable appearance instead of hiding it with more glue.
A relaxed ribbon accent should stay neat without staining through the material or interfering with the lid’s movement.
Design the ribbon as removable decoration, not packaging safety
A ribbon accent can make a plain gift box look finished without requiring a large amount of glue. Keep this project limited to the outside of a dry decorative box for a non-food gift. The adhesive must not contact food directly or indirectly, and the decoration should not become a child-accessible loose part, a carrying handle or a fastening that keeps hazardous contents secure.
Use an existing correctly identified Dremel 930 with suitable labeled original low-temperature adhesive. The model is retired in the identified range, so this guide does not promise current availability. Inspect the cold tool and cord before starting and leave a damaged unit out of use.
Choose ribbon and cardboard that can be tested on matching offcuts. Satin-like ribbon, open weave and coated card can show different marks after gluing. Color, shine and apparent thickness do not establish heat tolerance. Plan a decorative band or small folded accent that lies naturally in position without stretching the ribbon tight around the box.
Choose the 930 low-temperature combination
The 930 low setting is 105 °C and its high setting is 165 °C. Use an original compatible adhesive intended for the low setting, such as the manual-listed GG02 multipurpose 7 mm system, with its actual packaging requirements checked. Do not load the GG03 wood formula and turn the selector down simply because ribbon looks delicate; formula and mode must match.
Low temperature is still hot enough to burn and may still mark a sensitive ribbon or coating. It is a processing choice for a compatible system, not a promise that fabric cannot be damaged. Do not borrow a washability claim from a separate fabric adhesive or assume that a ribbon attached to a box will behave like a sewn textile seam.
The 930 starts heating when plugged in. Its temperature selector does not provide an off position. Prepare the mat, stand, scraps and ribbon pieces before connecting power, and route the cord away from the working area. The proper shutdown is unplugging, followed by complete cooling on the stand.
Trial both the visible face and the underside
- Cut and arrange the ribbon pieces before heating, following any separate cutting tool’s safe instructions.
- Put a matching cardboard scrap on a heatproof silicone mat, with no hand underneath the receiving area.
- Heat the 930 in the correct low mode according to the manual and establish a small controlled flow on scrap.
- Apply a modest amount to the supported trial contact area, keeping the nozzle off the ribbon and card.
- Position the ribbon through cool accessible edges and leave the sample until fully cold before lifting it.
Inspect the face for a wet-looking stain, darkened patch, shiny pressure mark or raised lump. Inspect the underside for glue penetration and the edge for squeeze-out. If the ribbon has an open weave, molten glue can pass through it; do not press directly above the bead with a fingertip, even briefly.
If the trial looks poor, reduce the amount or change the attachment layout only when the materials remain undamaged and the adhesive combination is permitted. If a small acceptable bond cannot be made, choose an untacked ribbon wrap or another suitable nonthermal decorative method. Do not hide a stained test area beneath an even larger bead.
Attach a small section and keep the box supported
Dry-fit the full band or accent on the empty box and mark its position with a removable external reference. Keep the lid’s opening path clear so the ribbon does not accidentally glue the box shut. Position the box flat on the bench; do not hold it in your lap or place fingers inside directly behind the bonding area.
Apply only enough adhesive for one small attachment, park the gun on its stand and place the ribbon promptly. Keep the ribbon relaxed rather than pulling it taut while the glue cools. For multiple points, finish one attachment before moving to the next so earlier beads do not skin over while you arrange the whole design.
Allow complete cooling before opening the lid or lifting the box by its body. Never use the decorative ribbon as a carrying handle. Check for loose edges, a distorted lid and visible marks under normal lighting. A failed point should be reconsidered after cooling, not reinforced with a hot mound that makes the ribbon stiffer.
Unplug the 930 and cool it fully before clearing the bench. Keep the finished box dry and away from heat; this is a display decoration, not a washable textile project or a food-safe package. The successful result is a neat accent that does not compromise how the box opens, how it is carried or what it can safely contain.
Models referenced