
Preserve the cold surface before considering a remake
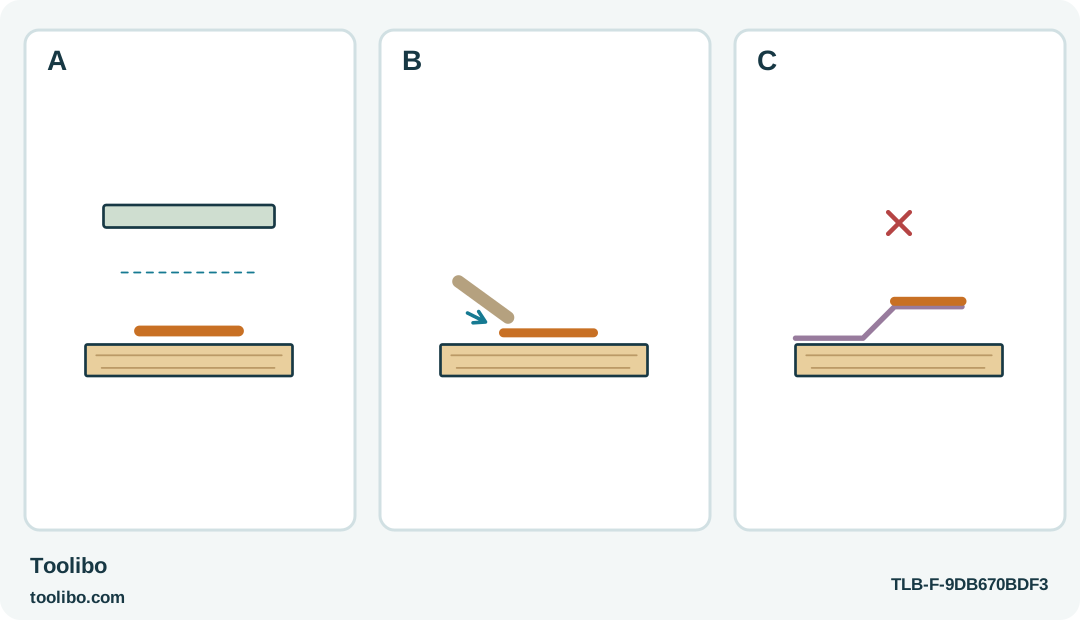
Separated residue, a blunt implement at its accessible edge and coating lifted with glue show the boundary of cold rework.
A
Inspect both separated cold faces before adding adhesive; a fit, timing or coating failure needs a different response.
B
Only gentle accessible cold-residue removal with a suitable blunt object is considered on a robust known surface.
C
Stop if the coating or substrate lifts with the glue. No nozzle reheating, blade or solvent is part of this rework.
Cold residue removal is worthwhile only while the underlying surface remains intact and a sound fit remains possible.
Read the failed joint before adding anything
When an old hot-glue decoration comes loose, a fresh bead is not the first step. Look at the cold pieces and ask where the failure occurred. Adhesive remaining mainly on one surface may point to poor contact or a material mismatch. A coating attached to the glue may mean the coating failed. A bent piece pulling away may indicate that the original dry fit was wrong.
Keep the repair limited to a nonessential dry indoor decoration. A loose carrying handle, furniture joint, electrical part or water-exposed component belongs outside this workflow even if someone previously used hot glue on it. Repeating an unsuitable repair does not become reasonable because the old adhesive is already there.
Remove the object from display and let all adhesive cool fully before examining it. Put the parts on a protected bench where detached pieces cannot fall. If the object has a delicate finish, antique value, brittle surface or an unidentified coating, stop before trying to remove residue. A removable decoration may be less valuable than the surface underneath it.
Remove only residue that yields safely when cold
The Bosch GluePen maintenance guidance allows hardened adhesive to be removed with a blunt object and prohibits solvents for cleaning. That is a limited approach to accessible cold residue, not a guarantee that glue can be removed from every painted, porous or fragile material without damage. Do not turn a general cleaning statement into a promise of finish-safe restoration.
- Switch off the tool and keep it separate from the cold inspection; no heating is needed for this assessment.
- Examine a small accessible edge of residue where the underlying material is robust and known.
- Use a suitable blunt implement gently, without digging under a finish or levering against a thin wall.
- Stop immediately if the substrate scratches, flexes, flakes or begins to lift with the glue.
- Clear loose cold fragments without rubbing them across the visible face.
Do not use a knife, abrasive wheel, flame or improvised solvent treatment. Do not place the hot nozzle against the old joint to soften everything at once. Although some adhesives can be released by heat, this household workflow does not provide a safe heating procedure for an unknown finished object. Leave stubborn residue alone when removal would damage the surface.
Rebuild the fit, not a mound of adhesive
Once any safely removable residue is cleared, dry-fit the pieces without power. Check whether old glue still holds the surfaces apart. If the pieces rock on a remaining lump, adding another layer may increase the gap rather than create a useful contact. Choose a new attachment method or abandon the cosmetic repair if the surfaces cannot meet cleanly without destructive preparation.
Look for the original cause. A dusty surface needs suitable cleaning; a bowed strip needs a better fit; an unsuitable material needs a different adhesive system. Do not use glue as a spacer to conceal all three. The repaired piece should stay in its intended position during a cold rehearsal without being forced against stored spring pressure.
Use a compatible adhesive for the exact tool. The GluePen’s 7 mm sticks and the PKP 18 E’s 11 mm sticks have different system requirements, and unknown remnants are not a reliable formula identification. Keep old loose sticks out of the trial if their labeling has been lost. A new stick that fits does not establish that it will bond to an unknown old adhesive layer.
Make one controlled trial and judge it cold
Trial the intended arrangement on equivalent materials where possible. Prepare a heatproof mat, a safe tool resting place and a way to position the parts through cool edges. Follow the selected model’s normal heating sequence. Apply only to the intended bonding area, join promptly and let the assembly cool without repeatedly moving it to inspect the seam.
If the bond skins over before you assemble it, stop and let the attempt cool. Do not slide the parts around in a partly set bead and expect the result to recover. Revise the sequence or divide the decoration into smaller attachments so you can complete each one properly.
Inspect the cold remake for alignment, lifted edges and movement under gentle ordinary handling. A second failure is a reason to end the hot-glue approach, not to surround the joint with a reinforcing shell. Keep any successful result in dry, cool indoor display; the rework does not add a structural or moisture rating.
Finish by switching off the GluePen or unplugging the PKP 18 E and allowing complete cooling before storage. Keep the failed materials and your observations separate from good consumables until you decide what to discard. A useful rework restores a small cosmetic attachment without sacrificing the underlying object; sometimes the correct repair is to leave the decoration unattached.
Models referenced