
Raised strokes need more space than ink
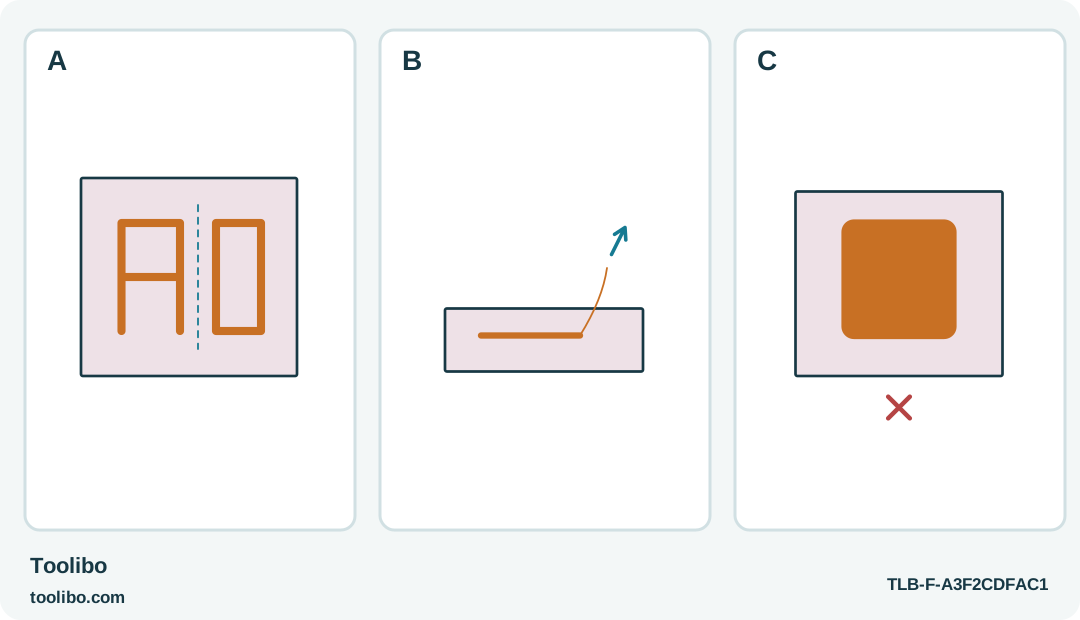
Open geometric letter strokes, a stopped-feed lift path and a closed overfilled counter show how bead size affects legibility.
A
Rehearse simple short strokes with generous inner gaps on the actual card. Use identified compatible GG04 on 930 low mode.
B
Stop feeding before lifting away; keep transitions on protected scrap and let adjacent strokes settle without touching them.
C
Extra layers can close a letter’s inner space and stiffen or mark the card. Reject an overfilled result instead of reheating it.
A raised bead needs enough room to preserve the open spaces that make a letter readable.
Decide what the lettering needs to do
Raised glitter lettering works best when the words remain readable without depending on a perfectly continuous bead. Start with a short name or label for an indoor decorative card and choose simple letter shapes. This is not a label that must survive washing, a food decoration, a child’s wearable or a repair that holds another object together.
Use an existing Dremel 930 and identified compatible GG04 glitter sticks on the low setting. This is guidance for known existing stock, not a claim that the retired accessory is currently available. The stock must still be suitable under its own packaging instructions. An unlabelled glitter stick from another packet is not interchangeable merely because its diameter looks similar.
Keep the 930’s decorative adhesive on its intended low-temperature system. High heat is not a shortcut to smoother writing. The gun and the glue can still burn at the low setting, so arrange the project as adult work with people and pets outside the hot area.
Draw a layout that leaves room for a bead
Sketch the letters lightly on a spare sheet first. Use generous spacing between strokes, especially inside letters with small openings. A printed font that looks elegant as ink may be too narrow when turned into a raised line of adhesive. Widen it or choose block forms before heating anything.
Cut and position the card in advance with appropriate separate tools. Keep its edges flat on a protected work surface. Do not plan to rotate a tiny piece between bare fingertips while glue is being applied. A larger practice sheet gives the supporting hand somewhere cool and clearly separate from the nozzle path.
Rehearse each stroke with the cold gun held above the guide. Decide where to start, where to stop feeding and where the gun will rest between letters. Work from a position that does not require reaching across a completed raised line to form the next one.
Establish the paper and adhesive combination
Use offcuts of the actual card and finish for the first trial. A glossy coated sheet may show a different mark from plain card, and a thin surface may distort even when another piece appeared fine. Keep the sample on a heat-resistant silicone support, with no hand behind the application point.
Set the 930 to its low position, connect the matching rated supply and allow it to heat on its stand. The gun is heating whenever plugged in; the selector does not switch it off. Begin with a small sample rather than pressing harder on an adhesive that is not ready to feed.
Let the test cool and inspect the front, back and raised edges. Reject scorching, curling, visible strike-through or easy separation during light handling. If the card cannot support a neat sample, change the card or the decoration method before moving to the finished wording.
Form one short stroke at a time
Follow the rehearsed route with controlled feed. Stop the trigger before lifting away at the end, rather than carrying a growing strand across the next gap. Park the gun on its stand while deciding whether the stroke is acceptable. Do not touch a warm ridge to flatten or reshape it.
Allow adjacent strokes enough time to settle that the next movement will not smear them. Build a letter in manageable parts rather than insisting on one uninterrupted pass. Keep the inside spaces open; adding another layer to repair a thick edge can close a small opening and make the letter harder to read.
If the loaded colour is changing, keep the transition output on protected scrap until it is suitable for the design. Do not pull remaining adhesive backwards. Avoid an ambitious multi-colour word if you cannot manage the changes without uncertain residue or repeated hot handling.
Judge the finished piece at its real viewing distance
After cooling, step back and read the lettering as someone else will see it. Check spacing and contrast as well as neatness. A slightly irregular stroke can be acceptable on a decorative card, while a perfectly smooth but crowded word may be unreadable.
If a letter is wrong, making a fresh card is often cleaner than trying to melt, scrape and rebuild the same patch. Keep any cleanup away from the hot tool and never introduce solvent or a pointed object into it. Unplug the 930, let it cool fully on its stand and store the labelled low-temperature stock separately from high-temperature sticks.
Models referenced