
Step-cleaning site plan
Use the Bosch two-handed, no-ladder boundaries to decide whether a reachable step section can be cleaned without losing footing.
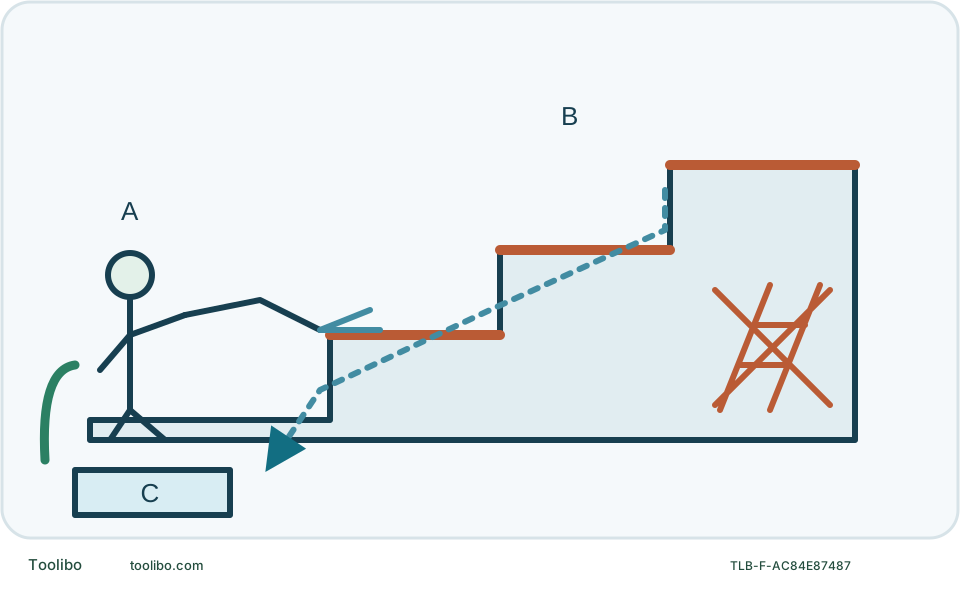
Survey
Find edges, weak joints and runoff while the steps are dry.
Position
Stable stance, both hands on the gun, no ladder.
Reassess
Stop between sections to check material, footing and hose route.
If the plan needs a handrail grip, hidden edge or wet escape route, change the cleaning method before spraying.
The first question is where your feet will be
Cleaning an outdoor step is not the same as cleaning a flat patio. The tread, riser and nosing create different angles, and runoff can make the next foothold less secure while debris hides an edge. Before choosing pressure, decide whether the entire proposed section can be cleaned from stable ground with both hands on the gun and the edges visible.
The AdvancedAquatak 140 and 150/160 manuals require two-handed operation, prohibit operating from a ladder and warn about edges on raised areas. These are useful hard boundaries for the layout. The plan below is an editorial application of those boundaries, not a manufacturer-approved procedure for every staircase. If you cannot maintain a safe position, use a manual cleaning method or an appropriately equipped professional instead.
Survey the steps while they are dry
Check for loose slabs, cracked nosings, weak pointing, coatings, slippery growth and any opening that leads into the building. Identify the material and its cleaning instructions. A surface that looks like stone may have a coating or repair that does not tolerate the same treatment as the surrounding material.
Find the destination for water and loosened dirt before starting. Runoff must not carry cleaning chemicals or contamination into a prohibited drain, neighbouring property or an occupied path. Unknown paint, hazardous contamination or suspected asbestos is not a pressure-washer experiment. Stop and establish the material and an appropriate method first.
Swipe or scroll horizontally to see all columns.
| Survey result | Plan change |
|---|---|
| Stable ground position reaches one small section | Consider a controlled test on that section |
| Reaching requires a ladder or leaning past an edge | Do not pressure wash from that position |
| Hose must cross the only escape route | Re-route before connecting the machine |
| Water pools on the intended standing area | Change the method or drainage plan before spraying |
| Loose nosing, failed pointing or coating | Repair or obtain material-specific advice first |
Do not adopt a universal top-to-bottom or bottom-to-top rule without checking where the operator will stand. On one layout, washing above the operator sends water onto the foothold; on another, reaching down from above hides the edge. The safe answer can be that the pressure washer is unsuitable for those steps.
Separate the machine position from the operator position
For the UK AdvancedAquatak 140, the supplied pressure hose is 8 m; the Ireland 160 package also lists 8 m, but with different hose construction. Route length is not useful reach measured through obstacles. Leave enough slack that normal gun movement does not pull the machine or load a coupling.
Keep the machine upright on a stable area, not balanced on a narrow tread. Arrange the clean-water hose and dry electrical connections outside the runoff and walking route. If the supply cannot reach safely within the machine instructions, do not bridge the gap with improvised electrical connections or incompatible pressure extensions.
Choose a small section and a safe place to pause. Both hands are needed for the gun, so a plan that relies on gripping a handrail while spraying has already failed. Do not use the pressure hose as a handhold or brace the lance against a railing to control recoil.
Test one reachable section, then reassess
- Clear loose grit and objects by a suitable non-pressure method. Keep other people out of the steps and the splash area; an apparently clear stair can become slippery immediately.
- Inspect and connect the machine as its manual requires. Establish clean water, clear trapped air with the machine off and verify the intended nozzle is fully attached.
- From the safe standing area, start with an appropriate fan pattern on an inconspicuous sound patch. Keep the pass moving and avoid directing the jet into open joints, under nosings or toward the building.
- Release the trigger and inspect both the cleaned material and your footing. Watch for exposed aggregate, colour change, displaced pointing, pooled water or an obscured edge. Any of these can change the decision to continue.
- Before moving to another section, switch off and isolate as required rather than walking backwards while spraying. Reposition the hose and check the next foothold without pulling a pressurized line across the steps.
A rotary nozzle is not the automatic answer to a narrow dirty riser. Its concentrated action can change the material as well as remove dirt. A surface cleaner that overhangs a tread is not supported like one on a broad patio; do not assume a large circular attachment solves an awkward step.
Stop when the layout changes
End pressure washing if the machine shifts, the hose snags, water enters an opening, the operator cannot see an edge or runoff reaches the standing area. A clean patch is not proof that the next tread is structurally sound. Use a brush or another approved low-energy method for areas that cannot be safely reached.
At completion, switch off, unplug with dry hands, shut off the water and release pressure safely before disconnecting. Keep the route closed until remaining water and debris no longer create a slip hazard. Record damaged joints or loose parts for repair instead of trying to erase their appearance with another pass.
Models referenced