
Three positions, viewed from the operator side
Nose points upward away from the operator; the selector is left, centred or right.
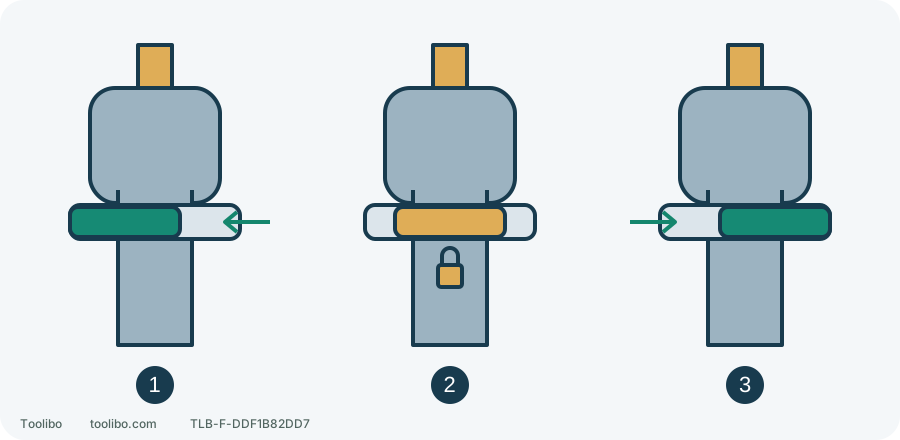
1. Forward position
Button ends left; pressing is from the right side.
2. Centre lock
Trigger locked, not electrically isolated.
3. Reverse position
Button ends right; pressing is from the left side.
Schematic positions only; stop completely before changing direction. Centre lock does not replace battery removal.
Find the direction control
The Milwaukee 3403/3404 control switch crosses the housing above the trigger. Hold the handle normally with the nose pointing ahead, away from you, before identifying left and right. Do not stand in front of the bit and transfer those side instructions from that viewpoint.
“Press from the right” and “move the button right” mean different things. Pressing from the right moves the button left. A bare instruction to push left can therefore confuse the pressing side with the final position.
These directions apply to 3403/3404, not every brand. For another tool, identify its markings and exact control illustration rather than judging by a similar handle or battery.
Stop before choosing a position
Release the trigger fully and wait for motor, chuck and accessory to stop. The control has an interlock and cannot be adjusted normally while the trigger is pressed; do not force both controls at once.
Swipe or scroll horizontally to see all columns.
| Intended action | 3403/3404 control | Check |
|---|---|---|
| Forward drilling or driving an ordinary right-hand screw | Press the control in from the tool’s right side | Select positively and verify rotation before use |
| Removing an ordinary right-hand screw | Press in from the left side | Match direction to the task and keep the bit fully seated |
| Pausing and preventing a trigger bump | Move the control to centre | Trigger is locked; this is not maintenance isolation |
A connection or accessory with special thread requirements may not loosen in the usual reverse direction. Establish its requirement first.
Check rotation without approaching the tip
The brief no-load check below is only for a short accessory suitable for this check under its instructions, not a long drill bit. Start long bits at low speed with the tip contacting the work as required. If suitability for a no-load check is unclear, stop and verify the model markings and instructions rather than running it. Fit the accessory with power disconnected and confirm secure retention and the absence of keys or loose objects near rotating parts. Refit the battery, hold the tool securely and keep the accessory clear of people, work and clutter. Briefly squeeze gently to check rotation. Never touch the moving accessory or bring your face in front of its point. If the direction is unclear, stop and recheck the markings rather than testing with a finger.
Only then approach the work. For screw removal, seat the bit fully and keep it aligned before starting under control. Reverse selection does not guarantee removal: cam-out, a seized fastener and clutch release are different problems.
Keep the controls separate
Swipe or scroll horizontally to see all columns.
| Control | Its job | Not its job |
|---|---|---|
| Direction switch | Forward, reverse and centre lock | Selecting a transmission range |
| Top gear selector | Low or high mechanical range | Reversing rotation |
| Mode or clutch setting | Choosing the appropriate drilling or screwdriving operation | Isolating electrical power |
| Trigger | Starting, varying speed and stopping | Making a moving gearshift or reversal safe |
When a bit or screw presents a problem, identify the failed interface first. Changing every control at once obscures the cause and can leave an unsuitable setup for the next operation.
Know when to stop
Remove the battery before changing accessories, cleaning, inspection or maintenance. Centre lock is useful for a pause and accidental-trigger protection, not complete isolation for those tasks.
Stop and remove the battery if the selector jams, will not hold its position or permits starting in centre lock. Do not hold it in place to continue or spray oil into its gaps. Record the affected position and have the fault inspected.