
Inspect both latches, not just one click
Simplified battery interface shows guides, left and right latches and visible contacts.
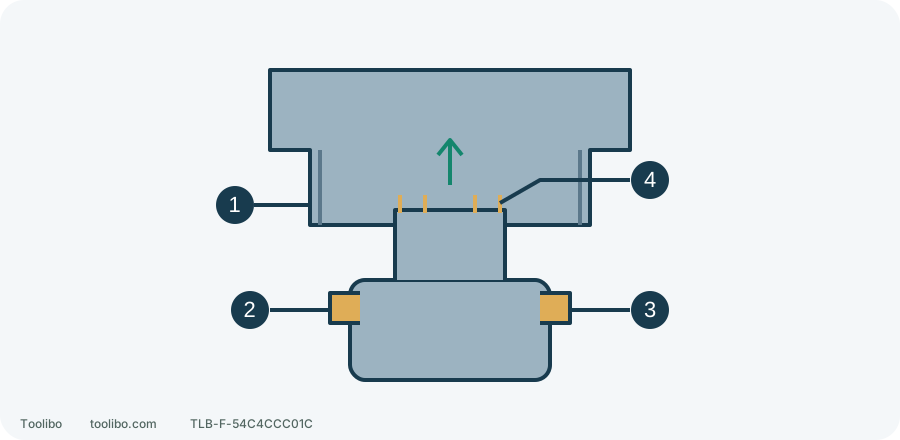
1. Guides
Look for obstruction or deformed plastic.
2. Left latch
Check damage and engagement on this side.
3. Right latch
The opposite latch must also engage.
4. Visible contacts
Observe only; no metal probes, reshaping or spray.
Identification schematic, not a dimensional or internal wiring drawing. Inspect only a stable, safely handled pack with power disconnected.
Exclude packs that must not be tried again
If smoke, leakage or continuing abnormal heat is already apparent, do not approach, handle or remove the pack for inspection. Move away from the hazard and seek appropriate emergency guidance. The removal check below applies only to stable equipment that can be handled safely.
A pack that will not fit or falls loose may have more than a seating problem. Release the trigger, let the drill stop, select centre lock and remove the pack for inspection. Do not try a swollen, cracked or leaking pack in another tool or charger. Visible burned contacts or an unusual smell also rule out another fitting attempt.
Stop using the affected pack, avoid leaked material and seek the manufacturer’s or an appropriate battery-disposal service’s handling advice. Smoke or continuing abnormal heat requires moving away from the hazard, not treating it as a routine installation problem.
The following routine is only for an externally sound, confirmed compatible pack without those warning signs. A matching brand, similar voltage or partial physical fit does not establish compatibility.
Inspect three areas without a metal probe
The PSBDD02 battery enters the base of the tool and has a release latch on each side. Examine both mating parts, not just the charge indicator.
- Guides and mating surfaces: look for debris blocking the insertion path and for distorted or broken plastic. Do not trim locating features to fit another pack.
- Both latches: check for cracks, missing material or obvious binding. One moving latch does not prove that both will lock. Do not pry with a screwdriver.
- Visible contacts: look from outside for foreign material, discoloration or damage. Do not bridge terminals with metal, abrade them or bend contacts to restore spring pressure.
Separate loose dry dirt from damage. With the pack removed, wipe loose dirt from the tool’s accessible plastic mating surfaces using a clean dry cloth, without pushing it into the connector. Do not automatically apply housing-cleaning methods to battery terminals. Deposits, corrosion or dirt requiring entry into the connector need further guidance rather than water, solvents or contact spray.
Insert normally and check retention
Once compatible parts are dry and visibly sound, keep the trigger locked and your finger off it. Align the pack with the base’s guides rather than forcing it in at an angle.
- Push along the normal insertion path until both side latches engage.
- Look from both sides for an unreturned latch, a raised side or obvious skew. A click does not replace checking both sides.
- Support the tool and, without pressing the release latches, gently check retention in the removal direction. Do not swing the drill by the pack or strike it as a test.
- If it slides out, is obviously loose or has an unengaged latch, stop. Remove it and recheck the mating surfaces. If normal fitting still cannot retain it, have the latch or tool interface inspected.
For removal, press both release latches and withdraw along the intended path. Pulling hard, twisting the housing or bending plastic does not replace releasing the latches.
Know what this check does not prove
Secure seating establishes mechanical retention on this installation, not internal battery health or normal tool power. If the tool still cuts out, do not keep working while pushing the pack into place. That hides a contact fault and may allow the pack to loosen while moving.
Do not use tape, ties, paper or added metal to maintain contact. Record both model numbers, which latch is affected and whether power fails immediately after fitting or under load. Those observations help service more than repeated insertion or homemade contact adjustments.