
UniversalAquatak 135: reach and spray modes
A wheeled machine connects to a 7 m hose and a Trio nozzle shown with separate fan, rotary and pencil-jet shapes.
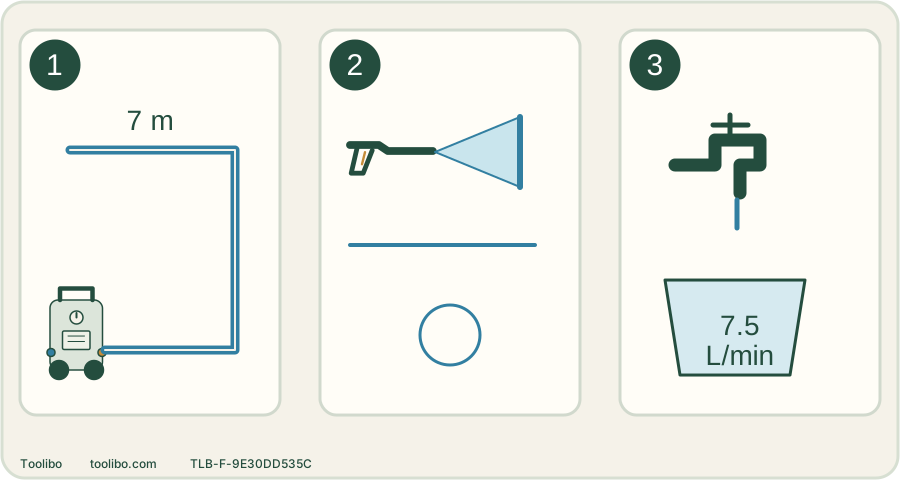
Reach
Check the 7 m route without hose tension.
Mode
Select the pattern for the surface; vehicle cleaning excludes rotary and pencil jets.
Supply
Check the minimum inlet requirement separately from output ratings.
Three nozzle choices increase convenience, not permission to use every pattern on every material. Conceptual schematic, not a product image or scale drawing.
Confirm the exact version
The UK retail identifier is 06008A7C70; the matched UniversalAquatak manual identifies the 135 in type family 3 600 HA7 C… Use the supplied plate and manual to confirm your machine. A different electrical market or similarly named package is not automatically covered by these figures.
Treat the package as a list of parts, not a promotional photograph. Check the gun, lance,7 m high-pressure hose, Trio nozzle, detergent attachment and inlet fittings supplied with the actual order. Do not assume a patio cleaner is included because the machine is shown cleaning paving.
Use the hose length as a layout decision
A 7 m hose can reduce repositioning compared with a shorter arrangement, but only if the route around the target is within that reach. Keep the machine stable and avoid pulling it by the hose. Wheels help move the unit after the work is safely stopped; they do not make dragging it under tension a good operating method.
Before choosing the machine, trace the farthest normal route around your car or garden furniture. Leave freedom to turn and keep the hose clear of wheels and sharp edges. If an extension is needed, verify the exact approved arrangement rather than assume another 7 m can simply be added.
Understand the Trio nozzle before spraying
The Trio nozzle combines fan, rotary and pencil-jet choices. That reduces loose attachment changes, but the modes are not interchangeable. A concentrated jet can damage a surface that tolerates a broader fan. Select for the material and task, not just for how stubborn the dirt looks.
Bosch’s instructions prohibit rotary and pencil jets on motor vehicles. For vehicle work, use the appropriate fan setting and respect the object’s cleaning instructions and distance limits. The detergent attachment is another separate function; do not infer that selecting a different water-jet pattern automatically draws detergent.
Check the supply against the manual
The product page gives maximum 135 bar and 7.5 L/min; the current matched manual gives rated 9.2 MPa and 6.4 L/min. It requires a minimum supply of 7.5 L/min, with inlet temperature no higher than 40°C and maximum inlet pressure 1 MPa. These are differently labelled values, not competing descriptions of one operating state.
Check the supply at the end of the intended garden hose before connecting the washer. A restrictive hose or partially opened tap can defeat an otherwise suitable machine. The self-priming option also needs the specified suction arrangement and priming method; it is not a workaround for an arbitrary poor supply.
Where the configuration makes sense
This kit is a reasonable candidate when the 7 m reach and quickly selectable nozzle modes solve frequent setup problems, and the water source meets its requirements. It is less compelling if your work is a few small objects beside the tap and the extra reach has no value, or if you cannot provide its minimum supply reliably.
Compare total cost with the accessory you actually need. For broad paving, check the compatible surface-cleaner option rather than buying the machine on pressure alone. For delicate objects, the ability to choose a restrained spray and control distance matters more than the highest maximum figure.
A first job with clear checkpoints
- Switch off and unplug before assembling the gun, lance, pressure hose and inlet fittings. Check that each joint locks; a fitting that will not seat is not made safe by extra force. Put the rinse nozzle and detergent attachment within reach before wetting the surface.
- Connect and open the approved water supply with the motor still off. Unlock and squeeze the trigger until water flows steadily. If it sputters, leave the motor off and check the supply, inlet fittings and hose bends; the power switch is not an air-removal shortcut.
- With the switch off, connect the protected electrical supply, then start only after the water path is established. Hold the gun securely and test the suitable fan on a small permitted surface. Stop for lifted coating or damaged joints rather than selecting a more concentrated pattern.
- For detergent, stop, unplug, close water, release pressure and lock the trigger before replacing the Trio assembly with the matched foam attachment. Use its own container and the detergent label’s mixture. Prepare a section that can be rinsed before drying; repeat the isolation sequence before returning to the Trio for rinsing.
If water sprays normally but detergent does not appear, first check that the detergent attachment—not merely another Trio pattern—is selected and its container is correctly fitted. Do not add concentrate to compensate for the wrong fluid route.
Models referenced