
Check reach, body clearance and hand position independently
Three original cabinet cross-sections show a deep recess, a close side wall and a restricted hand opening around a straight screw axis.
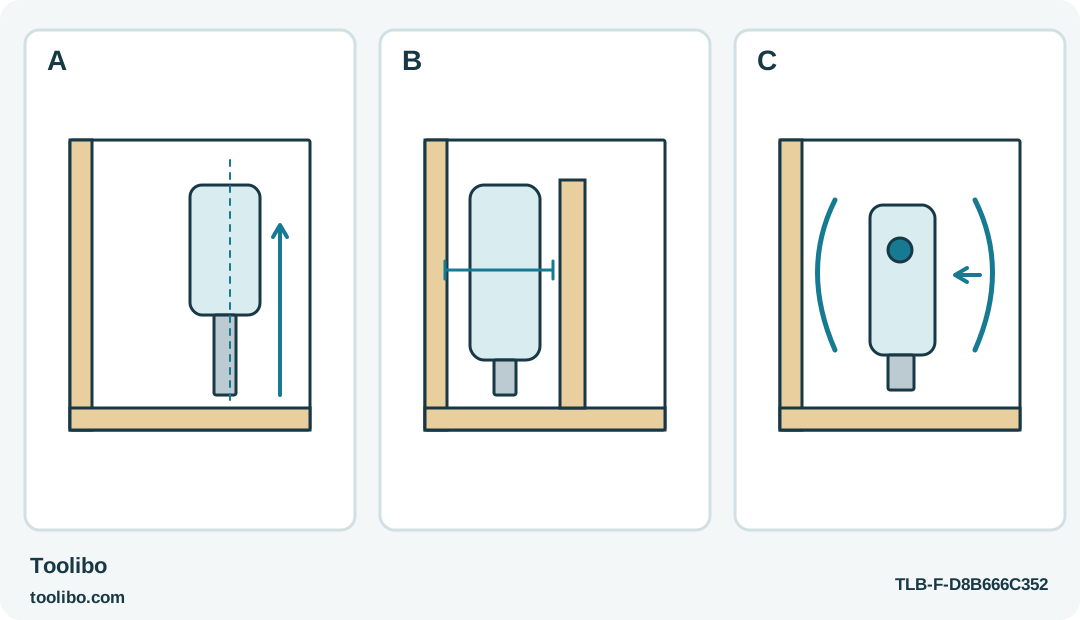
A · Axial depth
Identify the required reach along the visible screw axis before choosing a longer accessory.
B · Side clearance
The body must clear nearby surfaces without tilting the bit away from the screw.
C · Control access
Leave space to reach and release the control and to withdraw without pinching the gripping hand.
Each obstacle asks a different question. Tool shapes are conceptual and do not imply measured dimensional comparisons between models.
Measure the task before comparing tool shapes
A small driver can still be too large for a particular screw. Overall tool length is only one part of the problem. The available path must accommodate the bit, the tool body, your gripping hand and a safe withdrawal movement, all while keeping the bit in line with the screw.
Look at a representative accessible furniture fitting with the power tool stopped. Identify the screw’s direction and the surfaces around it. Sketch a line continuing outward from the screw head. That line is the approach you need to preserve; a tool that fits only when tilted is not a good solution.
Keep this comparison to visible, non-electrical fittings. Do not choose a tool by probing blindly behind a panel or into a cavity. If the screw or the work beyond it cannot be identified, improve access before making a purchasing or operating decision.
Distinguish depth from sideways clearance
A deep recess asks for reach along the screw axis. A side wall close to the screw asks for clearance around the tool body. These are different constraints. An extending shaft may help with the first and sometimes the second, but it does not create an angled transmission.
The WX252L changes reach with its extending shaft. Consider it when the screw is visible and a straight path exists, but the body would otherwise sit too far into the recess. Check the full approach and withdrawal, not just whether the bit tip can touch the head.
If the screw points across an opening that you cannot line up with, a straight extending driver is not the answer. Do not bend a bit or lean the shaft against the edge as a substitute for suitable access.
Compare grip shape with control access
The DF012D can be arranged in straight or pistol form. That can change where your hand sits relative to the tool axis. Stop the tool, set its lock lever to B and remove the battery before changing the grip, keeping fingers clear of the pivot, then assess whether the new position actually improves the approach.
A slim in-line tool such as the SD561201 presents another trade-off: its motor-starting collar must remain accessible without accidental operation during positioning. The body might clear the recess while your fingers cannot reach or release the control comfortably. Clearance does not establish screw suitability: for a powered softwood furniture task, keep this model to self-tapping screws no larger than ST3.5. Do not assume that this covers particleboard fasteners or cam connectors; unlisted screws are for manual, non-powered use.
Think about the entire hand position. A tool that requires a twisted wrist, pinched fingers or a grip near the rotating bit has not solved the problem simply because its body fits. A suitable hand screwdriver may provide a better controlled approach for an occasional awkward fastener.
Use the same stopped rehearsal for every candidate
- Use the correct retained bit and keep the motor unpowered or safely locked according to the model.
- Bring the bit to the actual screw along its axis. Do not use a different angle for each candidate merely to make it fit.
- Check the tool body and your gripping hand from above and from the side.
- Rehearse reaching the start control and releasing it without shifting onto the bit or striking the work.
- Withdraw the tool along the same path, allowing for the screw or fitting becoming loose during removal.
If you cannot handle a candidate before purchase, use its documented dimensions only as a screening aid. Make a simple non-powered clearance sketch or paper profile if helpful, but do not treat it as proof of grip comfort or safe operation. Accessory length and actual hand position still need checking on the real setup.
Consider the cost of added accessories
A longer compatible bit can change reach, but also changes the supported geometry of the approach. A holder plus an insert bit adds length differently from a single long bit. Each connection needs to be suitable for the tool and secure before use.
Do not stack unapproved adapters merely to cross a gap. Nor should a flexible or angled accessory be assumed compatible because it appears in a retailer’s bundle. Check the exact manufacturer’s instructions for the tool and accessory, including any handling limits, before considering that arrangement.
For a one-off furniture task, repositioning a removable part under the furniture maker’s instructions may be simpler than building a long accessory chain. Better access also makes the result easier to inspect.
Make the decision about the real screw
Choose the arrangement that preserves straight engagement, clear controls and a safe exit path with the fewest unnecessary connections. Extending reach is valuable when depth is the obstacle. A pivoting grip is valuable when hand position is the obstacle. A short in-line body is valuable only when it still leaves room to operate its controls.
None of those features guarantees more fastening power or better results on every screw. Do not infer torque, durability or speed rankings from the shape alone. After choosing the tool, carry out a cautious trial on an appropriate joint and stop if the bit slips or access changes. The winning option is the one that lets you complete and inspect the fastening without improvising an angle.
Models referenced