
Space can overrule a lower complete cost
A tool and fitted bit face a cabinet obstruction; stacked bars compare the two hypothetical complete costs.
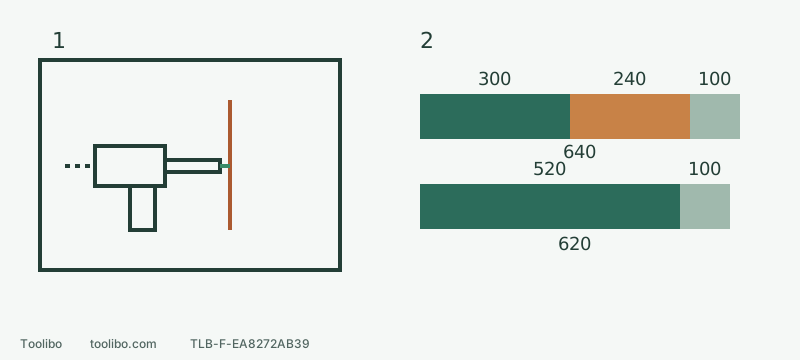
1 · Count the fitted bit
Allow straight alignment, insertion, withdrawal and hand space; do not solve a collision by tilting the tool.
2 · Add the missing equipment
Upper bar: 300 + 240 + 100 = 640. Lower bar: 520 + 100 = 620. Neither total makes an unsuitable tool fit.
Conceptual clearance, not a scale drawing. Bar amounts are fictional budget units, not prices.
Write down three jobs you actually plan to do
Start with the work, not a label such as beginner or professional. Record the material, hole or screw size, quantity and working space. This example is a planning exercise, not a construction specification for every home.
Swipe or scroll horizontally to see all columns.
| Job | Known conditions | What still needs checking |
|---|---|---|
| Assemble flat-pack furniture | Use the supplied screws as instructed; some positions are inside a cabinet | Correct bit, straight access and whether final tightening must be by hand |
| Fit hardware to a wooden board | Twelve 6 mm through-holes in a securely clamped 18 mm board | Suitable wood bit, backing board, drilling depth and clearance behind it |
| Drill a thin steel bracket | Four 4 mm holes in a removed, securely clamped 2 mm mild-steel bracket | Metal bit, support and the drill’s stated steel capacity |
Put wall mounting on a separate line. Until the wall material, concealed services and fixing requirements are known, a hammer-mode symbol cannot decide the tool. Do not make an exploratory hole to find out. Reinforced concrete, large hole saws and structural fastening are not automatically covered by the ordinary jobs above.
First check eligibility, not the biggest number
Match every job to the manual’s material capacities, permitted accessories and operating modes. A chuck accepting a bit does not prove the tool is rated for the resulting hole. Chuck capacity usually concerns the shank, not the maximum hole in every material.
Candidates A and B below are hypothetical teaching examples, not products for sale. Assume the correct manual editions explicitly permit the 6 mm wood holes and 4 mm mild-steel holes, and both accept the selected accessories. Only then continue. If A has a wood rating but no stated steel capacity, mark it unresolved; do not infer suitability from voltage.
Swipe or scroll horizontally to see all columns.
| Check | Candidate A | Candidate B | Decision for these jobs |
|---|---|---|---|
| Required drilling and screwdriving modes | Confirmed | Confirmed, plus hammer mode | An extra mode does not solve a listed need |
| Material and accessory limits | Both materials pass | Both materials pass | A failed requirement removes a candidate |
| Straight access inside the cabinet | Fits with the necessary bit installed | Cannot align at one required position | A suits this space; angling B is not a remedy |
Replace these assumptions with the actual model, market and applicable manual. Similar names or housings are not enough. If editions give conflicting capacities, resolve the applicable version rather than selecting the larger figure.
Consider the battery and bit when checking the fit
Check whether controls are easy to reach and whether the planned battery allows you to hold the bit on axis. Do not run the drill during a grip or dimensional check. Remove its battery as instructed before installing or changing accessories. Ask shop staff to follow their demonstration procedure rather than dismantling an unfamiliar display tool yourself.
A cabinet opening needs room for more than the bare tool. Add the actual exposed bit length, then allow space to insert and withdraw it and position your hand. One measurement from a hole to the back panel cannot establish that the whole assembly fits. A cardboard outline can help with a static comparison, but it is not a substitute for checking safe operation.
A smaller battery can be easier to position in confined spaces; a larger one brings bulk and weight as well as potential extra runtime. Consider the work period you actually need. Physical fit, a shared brand or similar voltage labels do not establish compatibility. Check the explicit tool, battery and charger compatibility information.
Compare ready-to-work costs, not bare-tool prices
List everything needed for these jobs. The amounts below are fictional budget units, not quotations or market-price claims.
Swipe or scroll horizontally to see all columns.
| Cost item | A as a bare tool | B as a kit |
|---|---|---|
| Tool or kit | 300 | 520 |
| Verified compatible battery and charger | 240 | Included, exact models checked |
| Bits and workholding needed for either choice | 100 | 100 |
| Complete total | 640 | 620 |
A looks cheaper on the product page but costs 20 more when completed. If you already own a usable, explicitly compatible battery and charger, A’s new expenditure could instead be 400. Do not remove the 240 allowance when battery condition or charger compatibility is unknown. Add any missing eye protection and other required protective equipment to both real budgets.
Finish with pass, unresolved or unsuitable
Remove tools that cannot complete the work or cannot be aligned safely. Then compare complete costs among the remaining candidates. In this example B is 20 cheaper but cannot reach the required cabinet position, so its lower total cannot decide the purchase. Choose A or look for another fitting kit; do not buy B intending to drive at an angle.
Before paying, record the exact tool and revision, battery and charger models, required accessories and unresolved restrictions. Settle any essential item still marked unresolved. A good purchase is not the tool with the biggest figures: it is one whose fit to your actual jobs you can explain, including the work it should not be asked to do.