
Change support or target, not everything together
A supported meter faces an opaque target while a dashed alternative beam and a displaced temporary board show separate possible changes.
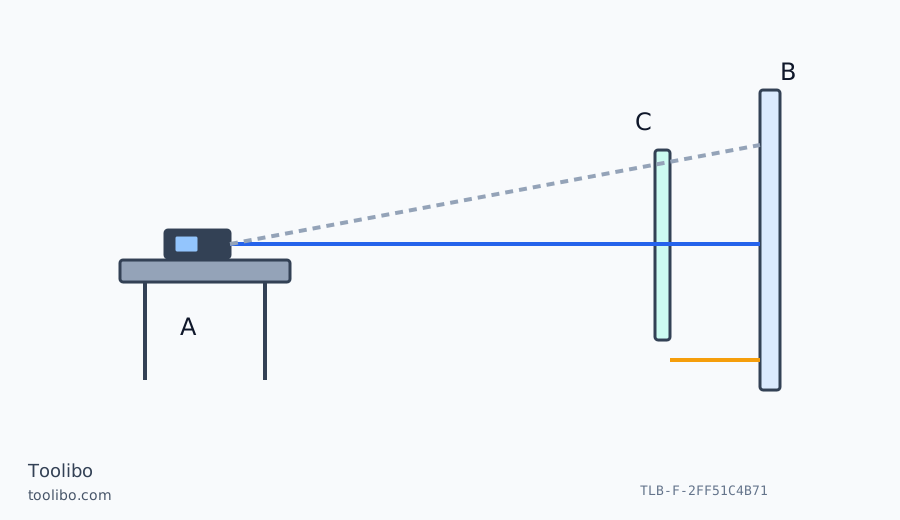
A
Start with stable external support.
B
Keep the original target plane identifiable.
C
A temporary board has its own displaced plane.
Preserve endpoints while checking one condition at a time; a moved target introduces a separate geometric change.
Make the comparison fair before blaming the meter
Two readings are comparable only when their endpoints, reference and geometry agree. Start indoors with a stable opaque target and a firm support. Keep the emitting and receiving windows unobstructed. Move a loose curtain out of the path and check whether a door or chair becomes the target between measurements. A changing room can produce changing readings without any change inside the instrument.
Write down several results rather than selecting the one you expected. Then lift and replace the meter and repeat the comparison. If changing the way it is held changes the result, examine rocking contact and hand movement. If changing the target changes the result, inspect reflection, transmission and an edge that the spot might miss. These are observations to guide the next check, not proof of a particular internal fault.
Change one condition at a time
Where appropriate, replace a shiny or difficult target with a suitable matte surface at a clearly defined plane. Record any displacement that this introduces. A board positioned in front of a wall is not the wall itself, and its reading cannot be used as the wall distance without understanding the geometry. Do not add a guessed board thickness regardless of its orientation or position.
Reduce strong background light where practical without directing the beam towards people. Stay within the exact model’s specified operating conditions and range. Check the reference and units before blaming electronics. A meter brought from cold storage into a warm room may need time to acclimatise as its instructions describe. Do not heat it deliberately to accelerate that process.
Record the actual error indication and exact model. A similar-looking error number from another brand is not a reliable diagnosis. If cleaning is permitted, follow the manufacturer’s external-care guidance rather than applying solvents or probing the optical opening. The aim is to simplify the normal measuring conditions, not to experiment on internal components.
Set a clear stopping point
If the readings become consistent under stable, reproducible conditions, repeat the relevant project measurements using the corrected arrangement. Do not assume that earlier uncertain values have become valid because a later test succeeded. If inconsistency persists, or the instrument has been dropped or visibly damaged, stop using it for consequential dimensions and follow the prescribed accuracy-check or service procedure.
A working display does not establish accuracy. Do not open the housing, adjust optics or create a homemade correction table. Never look along the beam with binoculars or other optical aids, and never aim it at eyes or people. Keep uncertain dimensions out of fabrication orders or clearance decisions until they have been independently verified by a suitable method.
Avoid making the investigation more hazardous than the original task. Do not climb furniture to create a target, look into the laser window, or expose the instrument deliberately to heat, water or impact to reproduce the problem. External checks should remain within ordinary use and the manufacturer’s instructions.
Prepare a concise record that service can use
Write down the model, selected reference, units and the actual error or changing values. Describe the target in ordinary terms: painted plaster, a mirror, dark fabric or a temporary matte board. Add whether the meter was handheld or supported and whether it recently moved between substantially different temperatures. These details help distinguish a difficult measuring situation from a possible instrument problem.
Use a simple span that can be checked directly. Keep its endpoints fixed and alter only one condition at a time. For example, improve the support without moving the target. If another check is needed, change the target surface while preserving the measuring plane as far as practical. Changing support, target and reference together makes it impossible to tell which change affected the result.
State whether the problem occurs on every measurement or only in one room. That distinction helps select the next appropriate external check without claiming more diagnostic certainty than the evidence supports. Keep the original readings, including inconvenient ones, rather than presenting only the results closest to expectation.
When seeking service, provide this short record and explain the ordinary checks already completed. After repair or replacement, remeasure the consequential project dimensions. Repair can address the instrument, but it cannot establish which earlier readings were affected. Keeping that boundary clear prevents an apparently resolved tool problem from leaving a hidden error in a purchase, cut list or installation plan.
Models referenced