
Bright target and safe shading
Original schematic: Strong background light makes targeting harder. Shade the target where practical and safe. Support the meter and identify the actual spot. Not to scale.
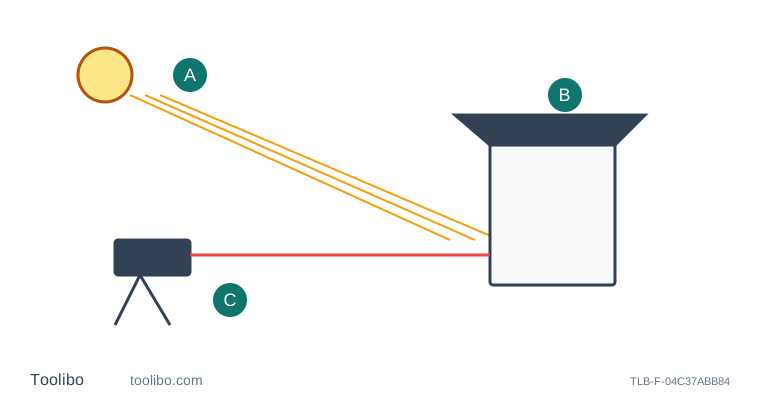
A
Strong background light makes targeting harder
B
Shade the target where practical and safe
C
Support the meter and identify the actual spot
Conceptual geometry only, not to scale. The diagram does not establish installation clearances or reproduce a manufacturer control layout.
Separate seeing the spot from receiving a valid measurement
Strong daylight can make a laser spot difficult to see on an indoor wall. That creates a targeting problem even before you consider whether the instrument can produce a valid reading. A faint spot does not automatically mean the meter is faulty, and a visible spot does not prove that the reported distance has the correct endpoint. Check both the actual target position and the instrument’s response.
Start with the exact model’s operating conditions rather than its largest advertised range. A range figure is conditional, not a promise that every bright, dark or reflective target will work equally well. Do not transfer claims between red- and green-laser variants or assume that a different colour removes the need for a stable setup. This guide makes no measured comparison of laser colours or brands.
Improve the ordinary setup before buying accessories
Where practical, reduce direct sunlight at the target by closing an existing blind or choosing a time when the wall is shaded. Keep the room safe to move through; do not darken a stair or obstruct access merely to make the dot easier to find. Use a stable opaque surface at a known plane and support the instrument so the spot does not wander across an edge.
If a temporary target is needed, follow the device’s instructions and record any offset from the intended wall. Secure it before measuring and do not ask someone to stand in the beam path holding it. A larger target can help define where a shot should land, but it does not excuse uncertainty about the plane actually measured. Keep nearby mirrors, open doorways and glossy furniture in mind when choosing the line of sight.
Avoid unsafe attempts to see farther
Never use binoculars, a telescope or another optical magnifier to look for the laser point. Do not look into the outgoing window to check whether the light is working. Keep the beam away from eyes, people and optical instruments, and switch it off when repositioning near others. A difficult-to-see beam must not be treated as harmless merely because it looks dim under daylight.
Do not assume that an accessory advertised as laser-viewing glasses is protective eyewear or that it guarantees a reliable measurement. Use only accessories and procedures appropriate to the exact instrument, with their limitations understood. Do not attach improvised filters, alter the optics or open the housing to make the beam appear brighter. If the target cannot be identified safely and clearly, choose another direct method or defer that measurement.
Check the result under controlled conditions
After improving the setup, repeat the same defined span and compare the readings without selecting only the number you expected. Then lift and replace the meter to see whether the target and support can be reproduced. Consistency is useful, but it is not a substitute for the manufacturer’s accuracy check or an independent verification where the project requires one.
If a reading fails, record the actual indication and look up its meaning in the matched manual. Error numbers are not universal across brands or generations. If the meter works normally on a simple indoor span but not on the sunlit target, preserve that distinction in your notes. It helps avoid treating a difficult environmental condition as proof of internal damage. If it remains unreliable under appropriate simple conditions, use the specified service route.
Finish by deciding whether the dimension is resolved. Do not fill an order form with a plausible value obtained while the spot’s location remained uncertain. Mark the dimension for remeasurement or use a suitable tape or other direct method. Bright-room measuring is successful when the endpoint and result are both dependable for the intended purpose, not when you eventually obtain any number on the screen. Keep the planning record separate from final fabrication or safety-critical clearance decisions.
Models referenced