
The pen ring and external charger report different states
A matched pair beside an identity record, a separate charger symbol and a pen with separate indicator states distinguish battery identity from readiness.
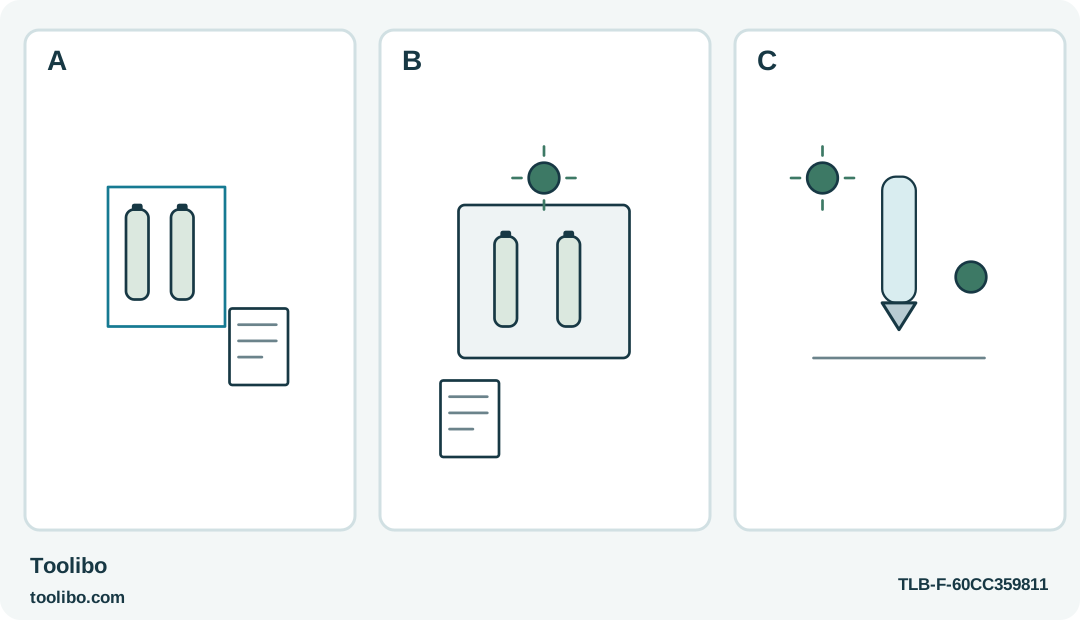
A
Use the identified matched HR6 NiMH pair; AA shape alone does not establish chemistry. Never charge disposable cells or fit lithium-ion replacements.
B
Read the external station LED and follow each marked slot polarity. This schematic does not prescribe the cells’ orientation in real slots.
C
The pen ring reports warm-up, ready or weak-battery conditions separately. Keep charger and pen observations distinct.
Battery chemistry, the external charger light and the pen’s heating ring answer three separate questions.
Identify the symptom before charging again
A Gluey that runs briefly may have weak batteries, unsuitable batteries or a feed problem that only looks like loss of power. Start by writing down what actually happens: no light, a rapidly flashing ring, normal warm-up followed by a short session, or a stiff slider despite a steady light. Those observations separate the next checks and prevent repeated charging from becoming the answer to every symptom.
Switch the pen off, place it safely and let the hot end cool. Keep the pen and charging equipment dry. If there is leakage, swelling, damaged insulation, a cracked compartment or an unusual smell, stop using the affected equipment. This procedure does not include opening the housing, repairing contacts or attempting to recover damaged cells.
The Gluey uses a removable battery pair, unlike the integrated-battery GluePen. Its battery compartment cover is an intended user access point. That does not make every AA-shaped cell suitable, and it does not authorize access to anything beyond the compartment.
Read both battery labels
With the pen cool and off, open the intended compartment and identify both cells. Use the specified HR6 NiMH type for this workflow. Do not insert lithium-ion AA replacements: similar physical dimensions do not make their chemistry or electrical behaviour equivalent. Do not put disposable batteries in the charging station.
The troubleshooting table distinguishes disposable cells: LR6 alkaline-manganese batteries can give only short operation, while R6 zinc-carbon batteries can leave the pen unable to work. Replace those with the recommended HR6 NiMH pair; never try charging the disposable cells.
Check that the pair matches in manufacturer and capacity. Replace the complete pair together when replacement is needed rather than combining one old cell with a fresh one. Keep their labels legible and store spare pairs so they cannot be confused with other household batteries.
Inspect only what is visible without tools or force. Corrosion, leakage or a damaged wrapper is a reason to stop, not an invitation to scrape the compartment or bend a contact. Keep loose metal objects away from removed batteries. If the pair cannot be identified confidently, obtain the correct replacements before making another powered test.
Use the external charging station correctly
Put the approved rechargeable cells into the specified charging station with the polarity shown inside its slots. Check each slot individually; do not assume that two neighbouring cells necessarily point the same way. Use the appropriate USB cable and a suitable power source for that charging station, following the source’s instructions as well.
The charging-station LED flashes while charging and becomes continuously lit when charging is complete. This is a different indicator from the light-up ring on the pen. A steady pen ring means the pen is ready to apply glue after heating; it does not report what is happening in an external charger sitting elsewhere on the bench.
If charging behaves abnormally, disconnect the station from its power source. Do not bridge terminals, force a cell into place or keep reconnecting damaged equipment to see whether the light changes. After a normal completed charge, disconnect the station and remove the cells before returning them to the pen.
Refit the pair and make one controlled test
Install the charged pair in the pen with the polarity shown inside its own compartment. Close the intended cover correctly without forcing it. Place the pen on the protected workstation and prepare a small scrap application using the correct short adhesive stick.
Switch on and observe the ring. Slow flashing accompanies heating; a continuous ring indicates readiness. Rapid flashing indicates weak batteries. These states should be observed before any attempt to force a resistant feed slider. A correctly charged pair does not make an unsuitable adhesive melt properly.
Apply a short sample once the pen is ready. Note whether the ring and feed remain normal during that modest task. If the pen works normally but the feed remains stiff, move to consumable and slider checks rather than repeatedly charging a battery that has already completed its cycle.
Decide between replacement, storage and service
A pair that repeatedly gives very short use after a normal charge may need replacement, but this observation alone does not prove that the charger or pen is fault-free. Use a correctly specified matched pair, and seek service if the same problem remains. Record the battery markings, the charging LED behaviour and the pen-ring behaviour separately so the service request describes an observable sequence.
For prolonged storage, remove the batteries from the cooled pen as instructed and protect them from damage and loose metal objects. Store the charging station and cable dry, without trapping the lead under other tools. Keeping the pair together and labelled is a simple way to prevent the next craft session from starting with an accidental chemistry mix.
Models referenced