
Open the jaws before withdrawing the bit
Section showing open jaws around a shank and the axial withdrawal direction.
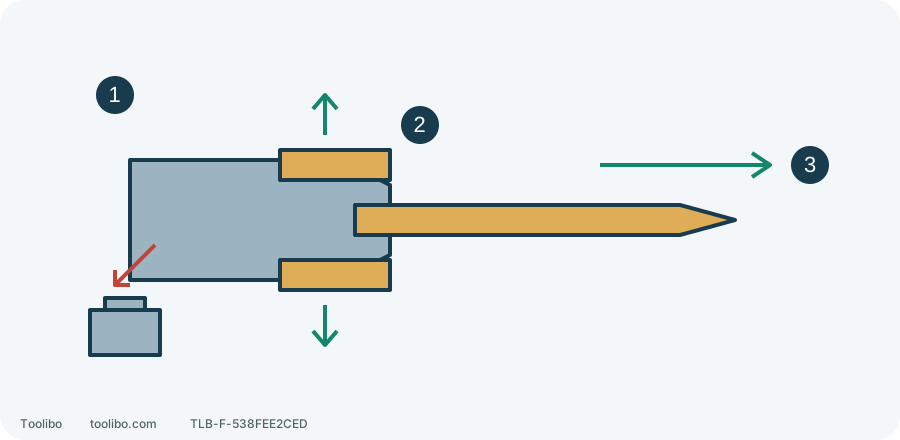
1. Disconnect
Remove the battery before handling the chuck.
2. Jaw clearance
Normal hand release must let the jaws move away from the shank.
3. Axial withdrawal
Support the bit and withdraw only after the jaws release.
Schematic only. Turn the sleeve by its release arrow with the battery removed; do not pull through closed jaws.
Establish where the bit is trapped
A bit still cutting into wood or metal is not simply a stuck-chuck problem. Release the trigger, wait for the drill to stop and disconnect power. Do not lever with the housing or repeatedly alternate powered forward and reverse. Resolve the trapped workpiece and accessory before attempting the free-tool procedure below.
If the bit is clear of the work and only its shank remains held, an ordinary release check is appropriate. This is not a chuck-removal procedure: do not open the housing, remove the chuck or search for internal screws.
Disconnect and position the tool
- Release the trigger, wait for a complete stop, select centre lock and remove the battery. Centre lock is not a substitute for battery removal.
- Let the bit become safe to handle. A cool sleeve does not prove that the cutting end is cool.
- Support the drill securely on a bench with the tip away from people. Never brace the point against your palm or body.
- Find the tightening and release markings on the sleeve. If they are illegible, identify the exact model’s illustration before proceeding.
The bench supports the tool; it is not a way to gain leverage. Do not clamp the housing in a vice and apply a long-handled tool to the chuck.
Follow the sleeve’s release arrow
The PSBDD02 keyless chuck opens by hand. Read the marking on the sleeve and turn in the circumferential direction shown by its release arrow. Someone saying “left” while looking into the nose is using the opposite viewpoint from a person behind the handle. Follow the tool’s arrow rather than transferring that instruction.
Steady the housing with one hand and turn the sleeve with ordinary hand force. Watch the three jaws open. Once they no longer grip the shank, support the bit and withdraw it along the chuck axis so it cannot fall on your foot. Do not grasp sharp flutes to twist or pull.
Stop if the sleeve turns without the jaws opening normally, or opens slightly and then binds. A normal release depends on normal jaw movement, not pulling an accessory through closed jaws.
Decide without escalating force
Swipe or scroll horizontally to see all columns.
| Result | Action |
|---|---|
| Jaws open normally and the bit comes out | Inspect the shank and jaws for visible damage before correctly fitting a sound accessory |
| Sleeve will not turn by normal hand force, or jaws will not open | Stop, leave power disconnected and arrange service |
| Cracked sleeve, crooked jaw or visibly distorted shank | Do not refit the battery for a trial; have service deal with the retained accessory |
Do not hold the sleeve and pulse the trigger, power the drill in reverse against a clamped bit, use pliers or hammering, apply heat or pour in penetrating liquid. Protecting your skin does not remove the risk of sudden release or a rotating accessory.
Tell service the model, accessory type, whether it remains in the workpiece and whether the sleeve is immovable or turns without opening the jaws. Mention the projecting length and sharp end before transport, and follow their packaging instructions. Recovering an inexpensive bit is not worth damaging the chuck.