
GTW 20: retained foam and separate capacities
Three panels show foam retained across modes, three volume specifications and a float-stop emptying sequence.
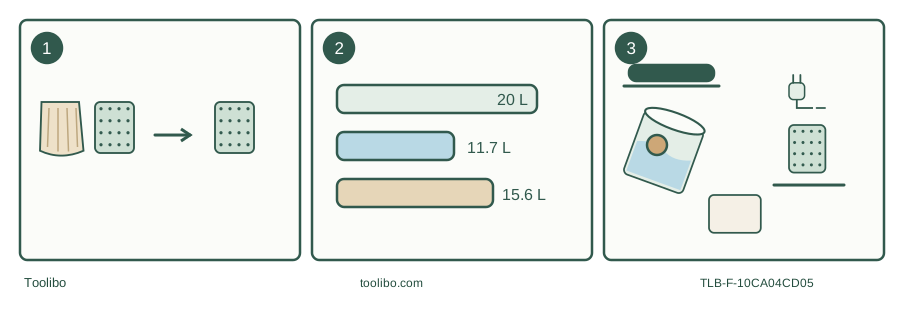
Retain foam
Rev04 uses foam for dry and wet pickup; the cloth filter is dry only.
Read separate volumes
20 L total, 11.7 L usable for liquids and 15.6 L usable for solids.
Stop and reset
Unplug after float-related suction loss, empty appropriately and clean and dry filters.
Original conceptual diagram, not an OEM assembly drawing or actual water-level gauge.
The foam stays in both operating modes
The most useful GTW 20 distinction is inside the head: its matched Rev04 manual says the foam filter stays installed for both dry and wet pickup. The cloth filter is for dry debris only. This differs from the GTW 10 Rev09 instructions even though the manuals list the same foam part number, FW005248. Shared replacement parts do not establish a shared operating sequence.
This guide selects the Brazilian 220 V GTW 20, catalog FW006491. The 127 V sibling is FW006490 and is not a dual-voltage setting on this machine. Match the actual nameplate to the outlet supply. The reference is the Portuguese manual marked Rev04, September 2022; if your supplied document differs, resolve that revision before applying the filter instructions.
Assemble a dry configuration deliberately
Work with the plug disconnected. Open the side catches, lift off the head and remove any stored accessories from the container. Fit the foam in its specified head location, then fit the cloth dust filter at the inside inlet for ordinary dry pickup. Refit the head and fasten both catches before attaching the hose to the suction inlet and locking it with the specified clockwise turn.
The manual lists cloth filter FW005258 and an optional disposable dust bag, FW005736. A bag shown as optional is not evidence that every carton contains it. Confirm the correct dry accessory and its fitting instructions before substituting it, rather than stacking unidentified bags or filters in the tank.
Use the appropriate nozzle and the two supplied extension sections without stretching the cord across the work area. The documented hose is 1.5 m and the cord is 2.5 m. A plan that depends on those lengths adding into a straight, unobstructed reach will often fail around furniture; reposition the empty machine safely instead of pulling against a snag.
Convert to liquids without removing the foam
Switch off and unplug before opening the machine. Remove the dry cloth or dry collection bag, empty loose debris and leave the correctly fitted foam in place. Keep the float protection intact. Reassemble and secure the head. The wet-use section excludes liquids containing detergent or cleaning chemicals that produce high foam; a wet/dry label does not make this a spray-extraction cleaner.
The total container figure is 20 L, while the matched manual states 11.7 L usable for liquids and 15.6 L for solids. These are different specifications, not alternative names for a twenty-litre water load. Plan the receiving container and route before collecting liquid, and stop earlier if the load would be awkward to handle.
The 1600 W electrical input does not establish suction power at the nozzle or prove a speed advantage over a lower-wattage model. Filters, hose restrictions and the collected material still affect how a task proceeds. Keep those distinctions in mind when deciding whether a larger tank solves the actual problem.
Respond to the float, then inspect the air path
The troubleshooting section identifies the float valve’s suction block as a reason to check and empty the dirty-water container. Switch off and unplug before doing so. The protection is a stop signal, not permission to keep the motor running until another cutoff occurs. Never obstruct or alter the float mechanism.
If reduced suction remains after emptying, inspect the hose connection, nozzle, hose and filters with power disconnected. Visible dust discharge calls for checking missing, dirty or incorrectly installed filters. Do not attempt to compensate for a defective filter by making extra passes. Persistent faults or damaged electrical parts require authorized service.
Empty, clean and separate wet storage from dry readiness
Remove the head and empty into a receiver suitable for the actual contents. The manual’s cleaning sequence rinses the foam under running water and requires full drying. After dry work, empty and rinse the cloth filter and clean the foam as instructed. Let all cleaned parts dry before reuse or storage; do not put them in a dishwasher or washing machine.
Keep the motor head and electrical connections dry. Store the machine empty with accessories secured, and check the water-level limiting device for dirt or damage during maintenance. A clean tank with a damp cloth filter is not yet ready for the next dust job.
The exclusions include flammable liquids, hot waste, sharp objects, iron or steel dust and sparks, very fine toner, plaster and cement, and substances harmful to health. The disposal route must suit the residue. Unknown chemicals do not become drain-safe after vacuuming. At end of life, use the local electrical-appliance collection route described by WAP rather than putting the machine in ordinary household refuse.
Models referenced