
From sealed air path to controlled drain
Three panels show head alignment, wet foam conversion and a low drain emptying into a suitable vessel.
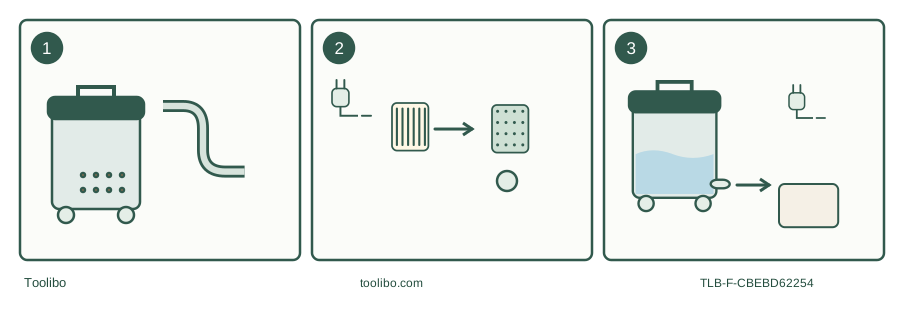
Align and lock
Seat the keyed head correctly and check each attachment joint.
Fit wet filtration
For larger liquid jobs, remove dry-only paper media and fit VF7000; retain float and cage.
Drain under control
Switch off and unplug, use a suitable receiving point and replace the cap.
Original concept schematic; actual latch and nozzle shapes vary.
Start by deciding how the drum will be emptied
The US RIDGID HD1200 is a 12-gallon NXT wet/dry vacuum; the matched SP7160 manual identifies the full model HD12000. Its large drum and built-in drain make the emptying route an important part of setup. Before a wet job, choose a suitable receiving container or permitted disposal point and leave room to reach the drain cap without moving electrical connections through the spill.
Twelve gallons describes the drum’s volume, not its working liquid limit. The float can stop airflow before that nominal volume is collected. A larger container also becomes heavier as material accumulates, so “keep going until full” is a poor lifting plan. Empty in manageable stages when the route includes thresholds, stairs or a high-sided waste container.
The US listing specifies 120 V, 9 A, a 15-foot cord and 2-1/2-inch locking accessories. Treat the 5.0 peak-HP label as the manufacturer’s laboratory motor designation rather than continuous output. This article does not compare measured suction or claim that the larger drum cleans faster.
Make the attachment path continuous
The current package description includes a 7-foot hose, two extension wands, an NXT Max floor tool with wet shoe and an NXT Max car nozzle. RIDGID also notes that included accessories can vary by store. An older box may have separate utility and wet nozzles, so identify the actual tool and its matching attachment instructions rather than forcing a current shoe onto an older nozzle.
Work along the air path from drum inlet to hose, wand and floor tool. Each joint needs the correct size and locking engagement. An adapter can change the connection geometry; it should not be treated as proof that every downstream attachment is appropriate for every material. Keep enough slack to steer the floor tool without using the hose as a tow rope.
The keyed drum-and-head arrangement also matters. Seat the head in its intended orientation, check the rim for trapped debris and secure both latches. A lid that almost closes is a reason to inspect the seating, not to press harder on the motor housing.
Choose filters for the actual material
The included VF4000 is the general-debris cartridge. The US listing names separate fine-dust, HEPA-material, wet-application and HEPA filter options, but those names are not a whole-machine certification for hazardous dust. Establish the material’s identity before choosing a filter. Unknown renovation dust, lead contamination and asbestos are outside this guide.
For ordinary dry cleanup, use a dry, intact, properly seated filter. The HD1200 accepts the VF3502 dry bag family; current listings also include other Size A bag types with different intended uses. Read the bag’s exact marking. A bag sold for dry dust should not be carried into a water job merely because another bag in the same size family permits wet debris.
Before changing modes, switch off, unplug and empty the drum. Separate the dry consumables from the wet accessories so they cannot be accidentally refitted together. If the previous job involved unsuitable substances, changing a filter does not make the remaining contamination safe.
Follow the SP7160 liquid rule
For small amounts of liquid, the manual permits keeping the filter installed while less than 2 inches (5 cm) is collected in the drum. For larger amounts, its instruction is specific: remove dry-only paper filters and fit the RIDGID VF7000 wet-application foam filter. Keep the cage and float installed. Do not replace this instruction with an older, generic “remove the filter” rule remembered from another vacuum.
Monitor the sound and pickup while working. A rising float interrupts airflow and produces a higher-pitched motor sound. Switch off and unplug; do not continue running against the closed air path. Liquid or debris appearing at the exhaust, or an abnormal motor noise, also calls for an immediate stop rather than a faster pass over the floor.
Drain without turning disposal into a second spill
With power disconnected, position the vacuum for a controlled release and remove the drain cap over the selected receiving point. Keep the cap where it will not be lost or contaminated. Refit it securely before the next pickup; an overlooked cap can turn a correctly assembled vacuum into a leaking container.
The drain is convenient for liquids, but does not sort contaminants or make a storm drain suitable for disposal. Select the destination according to the liquid’s contents and local requirements. Never collect flammable liquids, explosive dust, hot ashes or toxic materials in this machine.
Finish by emptying residual debris, cleaning the drum and drying the filtration before dry work. Store indoors. Keep the wet shoe and wet filter identifiable in storage, so the next changeover can be made by checking parts rather than guessing what was left installed.
Models referenced