
Cartridge, cage and float have different jobs
Three diagrams show retained cartridge filtration, cage and float positions, then airflow cutoff with a separate unplug step.
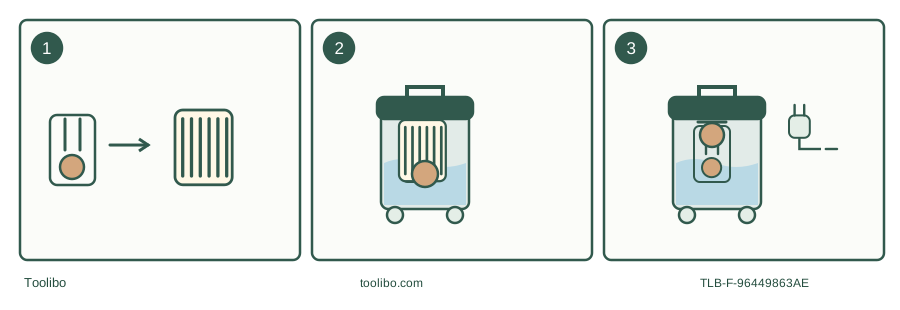
Keep the cartridge
The matched 2024 document requires it for wet and dry pickup.
Retain protection
Do not remove the cage or float when servicing the filter.
Stop at cutoff
Loss of airflow with rising motor pitch requires off, unplug and empty.
Original schematic of documented roles, not an OEM internal drawing.
The cartridge stays in for this DXV09P manual
The most important point in the US DEWALT DXV09P_2024 manual is easy to miss if you have used another shop vacuum: its liquid-pickup instructions require the cartridge over the filter cage. The maintenance section repeats that the Clean Connect filter must be reinstalled for both wet and dry pickup. Do not apply a generic “remove every filter for water” rule to this version.
Check the complete nameplate and document before changing anything. This is DXV09P, not DXV09P-QT, DXV09P-QTA or another suffix. The checked OEM file is named DXV09P_2024 and its cover matches DXV09P. This guide does not use an unrelated product-image filename as evidence that quiet-series instructions apply.
Know what the three internal parts do
The cartridge is removable filtration media. The cage supports it and guards the impeller area. The float rises with liquid and closes airflow at its operating level. Keeping those roles separate avoids the dangerous mistake of removing the protective cage when you only intended to clean the cartridge.
Before dry pickup, switch off and unplug, then check that the cartridge fully covers the cage and its seals meet the head without gaps. Lock its retainer as directed. An intact filter can still bypass dust if it is not seated correctly. If its material is torn or punctured, replace it rather than covering the damage with tape.
The disposable bag fits at the tank inlet and unfolds around the interior. Use it for its intended dry collection task, and remove a dry-only bag before wet work. It does not replace the cartridge requirement in this checked manual. A spare bag and a spare cartridge solve different problems, so label and store them separately.
Plan reach and drainage before a liquid job
The US documentation specifies 120 V, 60 Hz, 10 A, a nominal 9-gallon tank, 1-7/8-inch by 7-foot hose and 10-foot cord. The product listing also describes a tank drain and an external accessory storage bag. The 5 peak-HP claim is a laboratory motor figure, not continuous output, and tank volume is not a guaranteed working liquid capacity.
For a suitable water spill, first clear dry debris from the tank and identify where collected liquid will go. Keep the vacuum upright in a stable location with dry electrical connections. Do not route the hose so the only way to reach the last patch is to drag the drum across a cord or pull it toward the spill.
Retain the cartridge for liquid pickup as this manual requires. The document warns that repeated tanks of liquid can saturate it and cause exhaust mist; stop and dry or replace the cartridge rather than removing it and continuing under another model’s rule. Have the correct dry replacement available if the next task will involve dust.
What a full-liquid signal actually means
When the float rises, suction stops and the motor sound becomes higher in pitch. Switch off, unplug and empty the tank. The motor does not necessarily stop itself. Continuing to run against the raised float can damage the vacuum, and waiting for the sound to settle is not a substitute for emptying.
If the machine tips and suction closes, the manual calls for returning it upright and switching off so the float can return. Inspect the situation before restarting. If the machine or electrical parts have been exposed to water, damaged, or show abnormal operation, stop use and obtain appropriate service rather than repeatedly cycling the switch.
Leave the dry setup genuinely dry
Disconnect power before opening the drain or removing the head. Direct suitable liquid waste into an appropriate receiver and reinstall the cap. Never use the drain as justification for collecting flammable liquid, toxic material or unknown contamination. Explosive dust and hot or smoking objects are also excluded.
Clean the tank and filter following the matched instructions. A washed cartridge must be completely dry before collecting dry debris; the manual’s approximate 24-hour drying reference is not a guarantee in every climate. Check for holes and sealing damage after cleaning. Store the emptied vacuum indoors with its accessories organized.
If suction remains poor with a clear hose, empty tank and correctly fitted clean filter, stop at the owner checks. This guide does not authorize opening the motor housing or bypassing a protective device. A documented setup can prevent a configuration mistake, but it cannot diagnose every internal failure.
Models referenced