
Move, reduce, drain
Three diagrams distinguish rolling by the top handle, lifting a reduced load by the prescribed handles and controlled drainage.
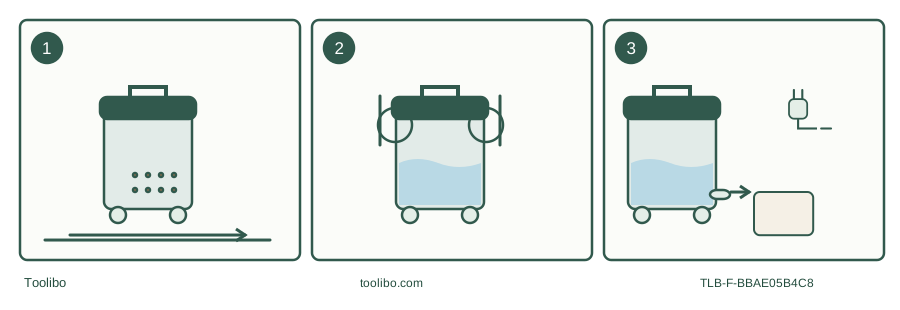
Maneuver
Use the top handle to position the upright vacuum; do not pull the cord.
Reduce the load
Before lifting, remove enough contents and use the manual’s drum latch handles.
Empty safely
Unplug, control the discharge and replace the drain cap before restarting.
Original handling concept; consult the matched manual for actual handle locations.
Treat the 16-gallon drum as a load to manage
The US CRAFTSMAN CMXEVBE17595 is the 16-gallon model identified as CMXEVBE175950 in the shared SP7075-1 instruction manual. Its useful owner question is not simply “How much fits?” but “How will I move and empty what I collect?” Nominal gallons describe drum volume. The actual collection limit depends on the material and operating conditions, and a liquid-full float can stop suction before the drum looks physically full.
The 6.5 peak-HP label is a laboratory motor designation rather than continuous working horsepower. This guide does not infer pickup speed or a suction advantage from that number. For an owner, a planned emptying route and correctly configured filter are more actionable than treating the rating as permission to collect everything in one pass.
Verify the package without borrowing the wrong model’s list
Use the CMXEVBE175950 column in the manual. It lists the vacuum, hose, two extension wands, utility, car and wet nozzles, Qwik Lock filter, disposable filter bag and the appropriate caster and hose-storage components. The current manufacturer web page has a mismatched Includes block describing a smaller 5-gallon kit. That block is not used for this guide.
If your box or used machine differs, reconcile the nameplate and supplied document before assuming that a missing attachment is optional or that a random replacement will fit. The full model identifier is especially important for bags: a bag that stretches around the drum but does not seal on the inlet is not a successful fit.
Arrange storage around the next job. Put the dry bag supply somewhere clean, keep the wet nozzle identifiable and leave access to the drain. Stacking unrelated items against the drain cap makes an otherwise simple emptying task more awkward when the drum is heavy.
Separate rolling from lifting
SP7075-1 distinguishes the top carry handle used to maneuver the vacuum from the drum latch handles used when lifting is necessary. First remove enough material to make the load manageable. Do not lift a heavy, liquid-filled drum by whatever part happens to be nearest, and do not pull the electrical cord to move the vacuum.
For a basement-to-garage route, plan the stairs before starting. A drain on the machine is useful only if there is a suitable receiving point where it can be used. If the disposal container is elsewhere, collecting smaller batches may make more sense than creating one large load that must be carried through the house. That is a workflow choice, not a statement about maximum load rating.
Keep the vacuum upright while operating. A hose that catches a bench leg can change the machine’s position suddenly. Move the drum deliberately rather than continuing to pull from the nozzle end.
Make the wet setup visible
Before a suitable liquid job, switch off and unplug, remove the dry bag and empty dry debris. The matched manual allows the cartridge to remain for small liquid amounts and recommends removing it for larger amounts. A saturated cartridge can produce exhaust mist. Keep the cage and float installed; their protective function remains necessary even when a filter is removed.
Do not add another brand’s foam-filter requirement or numerical liquid threshold to this older shared instruction. If using an optional wet filter, verify that filter’s own compatibility and fitting instructions. The correct setup is the one documented for the exact machine and consumable, not whichever arrangement looks most open.
When the float closes airflow, suction ceases and the motor sound becomes higher in pitch. Stop, unplug and empty. The float is not a motor-off switch. Never leave the vacuum running unattended while expecting the float to finish the job for you.
Empty, inspect and reset for dry work
Use the drain only after disconnecting power and directing the outlet toward an appropriate receiving point. Avoid splashing the head, plug or surrounding sockets. Replace the drain cap before restarting, then inspect for leakage rather than discovering a loose cap midway through the next pickup.
After emptying, clean the drum and check the filter for holes or tears. The paper filter can be cleaned following the manual, but must dry before dry debris or storage. Do not use damaged media simply because there is another bag somewhere in the system.
Flammable liquids, explosive dust, hot ashes and toxic or hazardous material remain excluded. A large drum does not make this a sewage-remediation system or an approved hazardous-dust extractor. Disposal must follow the contents; unidentified workshop liquid belongs in a controlled assessment process, not automatically in a household drain.
Models referenced