
Three seals, three separate checks
Three close-up diagrams show the cartridge gasket, bag collar between ribs and clean drum rim.
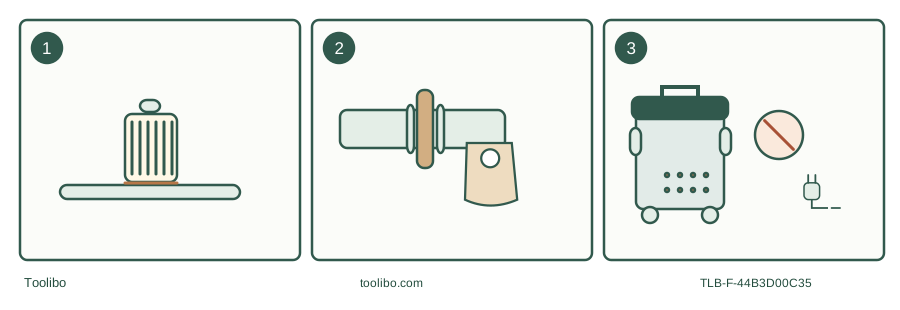
Cartridge
Seat the bottom gasket and Qwik Lock fastening without pulling on paper pleats.
Bag
Place the dry bag collar between the inlet ribs and unfold the bag.
Lid
Remove trapped debris from the rim and latch the correctly aligned head.
Original schematic; not an OEM part drawing or a bag-compatibility chart.
Identify the 12-gallon column before assembling anything
CRAFTSMAN sells the US 12-gallon vacuum as CMXEVBE17594. The matched SP7075-1 manual uses the full identifier CMXEVBE175940 and covers five drum sizes. Use the 12-gallon column when checking the box; the pictured 20-gallon machine and its accessory list are not your entire kit.
The 12-gallon package includes a locking 2-1/2-inch hose, two extension wands, utility, car and wet nozzles, a Qwik Lock pleated filter and a dust collection bag. The shared manual does not list the 20-gallon model’s crevice tool and muffler as included with this model. This matters when a missing-looking item is simply an accessory from another column.
The listed 6.0 peak horsepower is a laboratory motor rating. Twelve gallons is drum volume, not guaranteed liquid collection capacity. Neither figure is an independently measured promise about how quickly a workshop floor will become clean.
Inspect three seals for dry pickup
Begin with the machine switched off and unplugged. Lift the head and inspect the cartridge gasket, the bag collar if used, and the drum rim. These are separate sealing locations. A lid that latches correctly cannot compensate for a bag collar hanging loosely on the inlet or a cartridge seated above its gasket.
The Qwik Lock cartridge presses over its cage and snaps onto the central stud. Its lower rubber gasket must seat against the powerhead. When removing it, the manual’s movement uses the filter tabs while pressing the stud; pulling on paper pleats is not the fastening method. Stop if the filter is torn or its sealing surface cannot sit correctly.
The bag fits over the internal inlet tube, with the cardboard collar positioned between the two ribs. Unfold it inside the drum rather than leaving it trapped under the lid. The manual permits a correctly installed bag in place of, or in addition to, the cartridge for dry debris. That is a model-specific statement: do not transfer a bag-only configuration to another vacuum whose instructions always require its cartridge.
Use the bag to plan disposal, not to hide a problem
For ordinary workshop dirt, decide how you will remove the contents before starting. A bag offers a contained removal route, but heavy or sharp debris can demand closer monitoring rather than simply filling all available space. Replace a damaged bag instead of expecting the cartridge to catch everything that escapes it.
If pickup weakens, stop and unplug before checking the nozzle, hose, inlet and filtering. Do not immediately conclude that the motor needs replacement. The air path can be restricted at any of those points. Equally, visible dust from the exhaust is not a normal trade-off for collecting more material; check the filtration and stop using damaged components.
A useful job layout keeps dry consumables in a clean box and the wet nozzle in a separate place. After a helper has used the vacuum, inspect its internal setup rather than assuming the previous task was dry. A simple “dry” or “wet” storage tag can save an avoidable changeover mistake.
Change to liquid pickup using this manual’s rule
Remove the dry collection bag, empty the drum and check the intended liquid before proceeding. SP7075-1 permits leaving the cartridge in place for small quantities of liquid and recommends removing it for large quantities to avoid saturation and exhaust mist. It does not give the 2-inch threshold found in some RIDGID manuals; do not add that threshold here.
Leave the cage and float installed. The float is the liquid-level protection mechanism, not a disposable filter. When it rises, suction stops and the motor’s sound becomes higher in pitch. Switch off, unplug and empty rather than running the motor while the float remains raised. Keep the motor compartment and electrical connections dry throughout the job.
Close the loop after the pickup
Use the drain for suitable liquid disposal with the power disconnected, and do not lift a drum that is too heavy to manage. The shared manual distinguishes moving by the top handle from lifting by the drum latch handles; follow the matched handling instructions and reduce the load first.
Clean the drum, inspect the cartridge for holes and let wet filtration dry before dry work or storage. Do not vacuum flammable liquids, explosive dust, hot ashes, or toxic materials such as lead or asbestos. A collection bag does not authorize those jobs. Dispose of ordinary collected waste according to its actual contents; do not flush unknown workshop sludge down a convenient drain.
Models referenced