
Four admission checks before operation
A identifies a 7-1/4 in diamond-opening original blade; B shows physical disconnection; C identifies the bottom depth-lever contour against its scale; D shows the bottom housing-thread oil threshold conceptually.
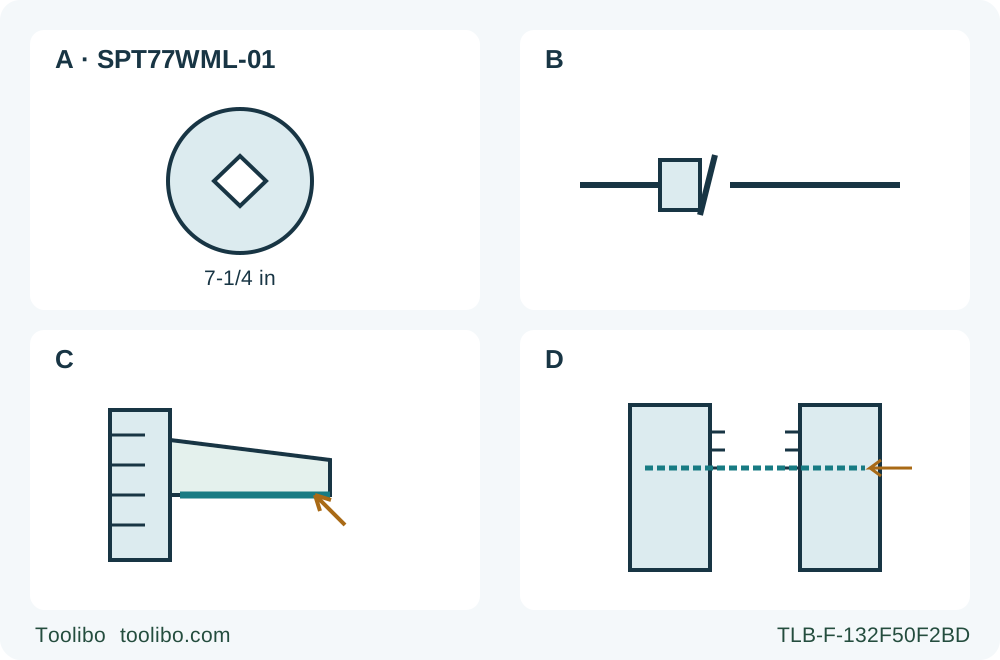
A · Retain the original diamond assembly
Use the correctly fitted original 7-1/4 in diamond-arbor wood assembly and qualified Vari-Torque setting; no substitute hole or deliberate clutch test.
B · Disconnect for checks
Switch off and unplug before inspection or adjustments. Verify guarding and trigger return; no inferred lock-off or fixed electric-brake time.
C · Reset actual work depth
After oil qualification at its prescribed checking position, reset the isolated tool for stock thickness using the lever bottom contour, secure the lever and verify less-than-full-tooth projection.
D · Require completed oil qualification
Before every use, the full prescribed check must establish correct oil condition and level not below the bottom housing threads, no overfill and a correctly restored assembly. Unknown condition means no operation.
All panels describe prerequisites or unplugged checks, not a running cut. A does not teach blade fitting or arbor conversion. B replaces any assumed trigger lock with actual disconnection. C is a conceptual lever-contour reference; the actual wood projection must still be less than a full tooth. D is not a filling or plug-removal recipe: the complete manual requires the unplugged horizontal maximum-depth checking condition, proper lubricant and restored oil-plug/lock-button assembly. The actual pre-use oil check must already be completed competently before this operating task proceeds.
An SPT77WML that starts normally has not necessarily passed its pre-use checks. This worm-drive saw has an explicit oil-level requirement before every use, a diamond-arbor original blade assembly and a friction clutch whose setting is not equivalent to maximum bolt tightness. Those conditions must be established before a square sample becomes an appropriate operating task.
This guide is for an existing US SPT77WML-01 with its standard plug and the complete manufacturer instructions 1619X09207, footer 04/17. The current product links that dated manual; it is not presented as a newly written revision. The twist-lock SPT77WML-72 and its connector instructions are outside this scope. The outcome is an oil-qualified, original-assembly owner admission followed by a supported square wood sample, not a repair or oil-service tutorial.
Treat oil qualification as the first gate
The manual requires the oil level to be checked before using the saw. This applies even though it also says the tool was lubricated before supply. Yesterday’s check, an apparently healthy motor sound or an old service receipt cannot replace today’s required check. Before proceeding, the owner must have completed the exact prescribed pre-use check competently under the full manual, or obtained qualified assistance to do so.
The prescribed checking condition is unplugged, with the foot on a horizontal surface and the tool at maximum depth. The oil must not be below the bottom housing threads; the manual identifies Skil lubricant 80111 and warns against overfilling. The combined oil-plug/lock-button assembly must be correctly replaced after the check. These are the conditions to verify, not an invitation to remove a plug from an energized or arbitrarily positioned saw. This article does not replace the full opening, checking or refitting instructions.
Do not proceed if the oil identity, level or condition is unknown, if the assembly has not been correctly restored, or if leakage or damage is apparent. The manual calls for the first oil change after ten hours on a new saw; an unknown maintenance history requires resolution rather than an assumption that the interval never arrived. Dirty or thick oil also requires appropriate service. Do not substitute generic gear oil.
The manual contains a separate warming and draining paragraph, but this operating guide does not export a warm-up, drain or oil-change sequence. Our conservative boundary is to have unresolved lubrication or service history corrected under the complete instructions by a competent service provider before operation. It is not a claim that the manufacturer forbids every capable owner from performing its documented work. Record the completed pre-use qualification, then leave the tool unplugged for the remaining setup.
Retain the correctly commissioned blade and clutch
The specified blade is 7-1/4 in with a diamond arbor opening. It must be the correct original fitted wood assembly, suitable for the actual tool’s nameplate speed and matched to its original inner and outer washers and blade stud. A round hole of apparently similar size is not equivalent. This task does not teach knocking out a blade centre or adapting a different blade.
The Vari-Torque clutch is the frictional interface between the outer washer and blade. Its correct assembly matters: excessive tightening can defeat its intended action. Do not apply another saw’s bolt direction or torque rule, use a longer wrench for extra force, or deliberately jam the blade to test the clutch. Retain an already correctly commissioned assembly. Unknown fitting, damage or unexpected slipping means stop and obtain complete exact-manual correction, not a small experimental adjustment during the sample.
Inspect with power disconnected. Confirm that the blade is sound, the installed assembly is secure and the spindle lock is released for normal operation. The lock button is not a running brake. Keep the supplied wrench out of the blade assembly and correctly stowed: its intended orientation and second locking detent matter, because incorrect storage can damage the work.
Check guarding, supply and unused accessories
Use the lower-guard lift lever while unplugged to check free movement and immediate closure. The guard must clear the blade and other parts at all angles and depths of cut, and the spring must return it reliably. A bent, sluggish or obstructed guard requires service before cutting. Do not tie it open or use the special plunge procedure for a normal edge-start cut; automatic guard operation is required here.
Check the switch without power and confirm return to OFF. The documented control is a trigger: squeeze to start and release to stop. Do not invent a trigger lock-off based on another model. The current product lists no electric motor brake, so no short countdown can substitute for observing actual standstill. A switch that cannot control the motor is a stop-and-repair condition.
Match the actual nameplate electrical requirements and standard plug to a suitable direct supply. Inspect cord and plug condition and keep the work dry. No alternative supply, twist-lock conversion or extension-cord recipe is included. Keep the hook lowered until it snaps closed when not in use; this sample does not require hanging the saw from a structure or clothing.
Set the work depth after the oil check
The maximum-depth position used for oil checking is not the correct depth for every cut. With the plug still removed, reset the tool for the actual stock. Loosen the depth lever between the guard and handle, hold the foot down and raise or lower the body by the handle. Align the bottom contour of the depth lever with the intended mark on the calibrated depth bracket, then secure the lever.
Verify the actual projection, not just the lumber-size mark. Use less than a full tooth below the wood, following the stricter safety instruction rather than the setup illustration showing one tooth. Make this isolated inspection without placing fingers in the tooth path. A change of stock thickness requires another depth check; the oil-check position must not accidentally carry over into a thin-panel cut.
Set zero bevel with the front lever and lock it securely. The separate 45-degree stop spring belongs to the greater-angle range. The manual documents that range, but current marketing also mixes 51- and 53-degree statements; this square workflow does not need to resolve them through a trial adjustment. Do not use the spring as a depth control. If the base will not hold square, obtain proper correction rather than incorporating alignment or maximum-depth stability-screw adjustment into this sample.
Make a supported and guided wood sample
Choose clean, known, uncoated wood suitable for the original blade. Inspect for nails, inclusions and defects. Do not make the trial on a log, hazardous finish or unknown material. Mark the required retained edge and waste side. Clamp the stock to a stable surface with enough retained area to support the broad portion of the foot throughout entry and exit.
Support both sides near the cut and near panel edges without placing supports in the blade path. The manual depicts support timbers on their broad faces, not their narrow unstable edges. The blade must cut only the work, not a bench or floor below. Prevent sagging into the kerf and avoid trapping the offcut against the blade. No hand or leg substitutes for workholding.
For a rip sample, use a suitable straight board guide clamped to the stock, with the right side of the foot against it as the manual specifies. Establish the actual guide offset on scrap rather than assuming a standard distance. The optional rip fence is not automatically included, and this guide does not substitute an arbitrary fence or rail adapter. Check that the guide and clamps clear the blade, lower guard and full travel of the housing.
At zero bevel, the large foot notch is the line reference; the smaller notch belongs to 45-degree cuts. The manual calls these approximate references and requires sample cuts to verify the actual line. Place the good face down when appropriate to reduce splintering, but do not treat that as a guaranteed finish. Keep the same blade, angle and contact side when assessing the reference.
Rehearse, cut and stop under control
With the plug out, rehearse the full path. Route the cable so it follows freely without crossing the blade line, catching clamps or pulling the saw sideways. Plan a stable stance with the body out of line with the blade. Both hands must remain available for the main and auxiliary handles. Wear suitable eye, hearing and respiratory protection, and provide ventilation appropriate to the known wood dust; do not invent a dust-extraction fitting for this body.
Before connection, confirm the oil gate is complete, the oil-plug/lock-button assembly is restored, both adjustment levers are secure, the hook is shut, the wrench is stowed and the guard returns freely. The blade must be clear of the wood at the supported starting position. Hold both handles, squeeze the trigger and allow full speed before entering the work.
Advance forward with light, continuous pressure, keeping the foot flat and the path straight. Neither hand may interfere with guard movement or reach below the work. Do not force a slowing saw or twist it back to a line. At normal completion, clear the cut, release the trigger and maintain control through coast-down. Wait for complete stop and lower-guard coverage before moving or setting the tool down.
If binding or another interruption occurs, release the trigger and hold the saw motionless until the blade stops. Never pull a rotating blade backward. Unplug before investigating. Unexpected slip, abnormal noise, overheating, vibration or loss of support ends this trial until its cause is resolved. This workflow does not teach an interrupted-cut restart, oil warm-up or clutch test.
Accept the sample and preserve the admission record
After standstill and unplugging, inspect the retained piece for consistent width, straightness, squareness and acceptable breakout. Check whether the guide moved, the locks held and the cord travelled without snagging. A usable dimension does not excuse a fault in guarding, support or lubrication qualification.
Record the actual tool and manual, completed pre-use oil check, original blade identity, stock thickness, depth setting, zero bevel and guide contact side. If needed, confirm the reference on another supported sample before important work. A later blade, angle or support change needs renewed checks, and every later use still needs its prescribed oil-level check.
Keep power disconnected for cleaning. Use the manual’s permitted cleaning methods with eye protection for dry compressed air, and do not insert pointed objects through openings or experiment with damaging solvents. Internal repairs, unresolved lubrication work, brush work and blade servicing are outside this task. Store the saw disconnected, stopped, guarded and with the unused hook closed. The useful result is not merely a completed cut: it is a cut made only after the worm-drive-specific admission conditions were actually satisfied.
Models referenced