
Restrain movement without blocking the working path
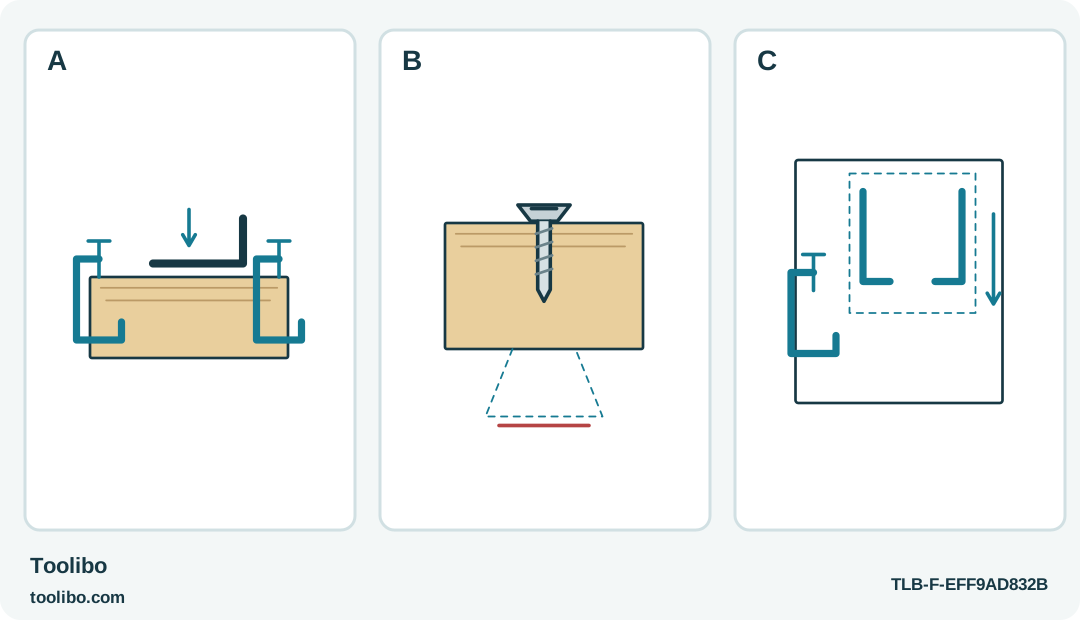
A restrained bracket, a clear zone beyond the opposite face and a jaw envelope beside a clamp show three workholding checks.
A
Support the fastening area and restrain sliding or rotation with suitable finish-protecting workholding.
B
Keep fingers out of the potential screw exit and slip paths; do not use a palm behind a thin part.
C
Check holder jaws, clamps, grip and withdrawal together. Do not remove the only restraint just to gain clearance.
Workholding must prevent movement while leaving the screw path, holder jaws and withdrawal route clear; a supporting palm is not a substitute.
Make the part stable before choosing a driver
A small bracket or wooden component can move surprisingly easily when a screw begins to bite. If the free hand is also trying to balance the part, hold the screw and protect the finish, the setup has too many jobs competing for the same fingers. Start by deciding how the workpiece will remain in position without a hand in the bit path.
This guide concerns ordinary, accessible furniture components using the WORX WX255L or Makita DF012D within their intended fastening scope. It does not design a structural joint or specify new screw sizes. Use the furniture maker’s hardware and assembly method, and keep electrical equipment or concealed services out of this task.
Support the direction of the force
Place the component on a stable surface with the finish protected. Consider where it could tip, slide or rotate when the screw begins turning. A flat part needs support under the working area; a small fitting may also need restraint against rotation. Do not assume its own weight will keep it still.
Use suitable clamps or another appropriate workholding arrangement where the component permits it, without crushing or damaging the part. Position restraints so they do not obstruct the bit, screw travel or your grip. A clamp that must be removed halfway through the powered fastening has not solved the whole setup. Rehearse the full approach and withdrawal before restoring power.
Keep the screw’s exit path visible
Identify the intended screw length and the material it enters. Inspect the opposite face where accessible, and keep fingers away from a possible screw exit. Do not use your palm behind a thin part as a substitute for a backing support. If the workpiece conceals the far side or its construction is unknown, resolve that uncertainty before driving.
A matching spare piece can be useful for a permitted trial, but it must reproduce the relevant joint rather than merely look similar. Do not improvise a new pilot-hole pattern or substitute a longer screw to make the part easier to hold. Workholding should support the specified joint, not quietly change it.
Understand what the WX255L holder does
The WX255L screw holder supports the loose fastener separately from the bit-retention system. It does not clamp the furniture component. Set up the holder with the tool stopped and locked, and check that its jaws and the tool body have room to approach and withdraw without touching the workholding.
If the holder collides with a clamp or bracket, do not remove the only restraint just to make it fit. Change the arrangement or use a suitable hand tool. Likewise, a securely retained Makita bit does not secure a loose workpiece. Switch off the DF012D, set its lock lever to B and remove the battery before accessory changes or setup adjustments, including arranging the sample or fitting.
Run a short, observable fastening stage
Wear eye protection and keep loose clothing, hair and hands clear of the rotating area. Restore the correct power source only after the bit, joint and supports are ready. Engage the bit fully and keep its axis aligned with the screw. For a DF012D controlled trial, use low gear and an appropriate numbered clutch setting, not the drill symbol.
Drive briefly, release the control and check whether the component has moved. Stop immediately if a clamp shifts, the part tips or the screw starts to pull the fitting sideways. Do not reach into the rotating area to straighten it. Let rotation stop and isolate the tool before correcting the arrangement. Continue only when the original cause of movement has been removed.
Inspect before releasing the restraint
When the screw reaches the seat required by the furniture instructions, stop and inspect the fitting, panel and visible opposite face. Remove the tool from the work before releasing clamps. A part that springs out of alignment as restraint is removed may indicate a joint or assembly problem; do not automatically tighten the screw harder to force it back.
Put loose screws and accessories in a container rather than on the support surface where they can scratch the finish or destabilize the next part. A successful setup lets you operate the driver with a secure grip while the work stays still independently. If the part requires a finger beside the rotating bit to remain in place, improve the setup before the next fastening.
Models referenced