
Mounting geometry is not overall bit length
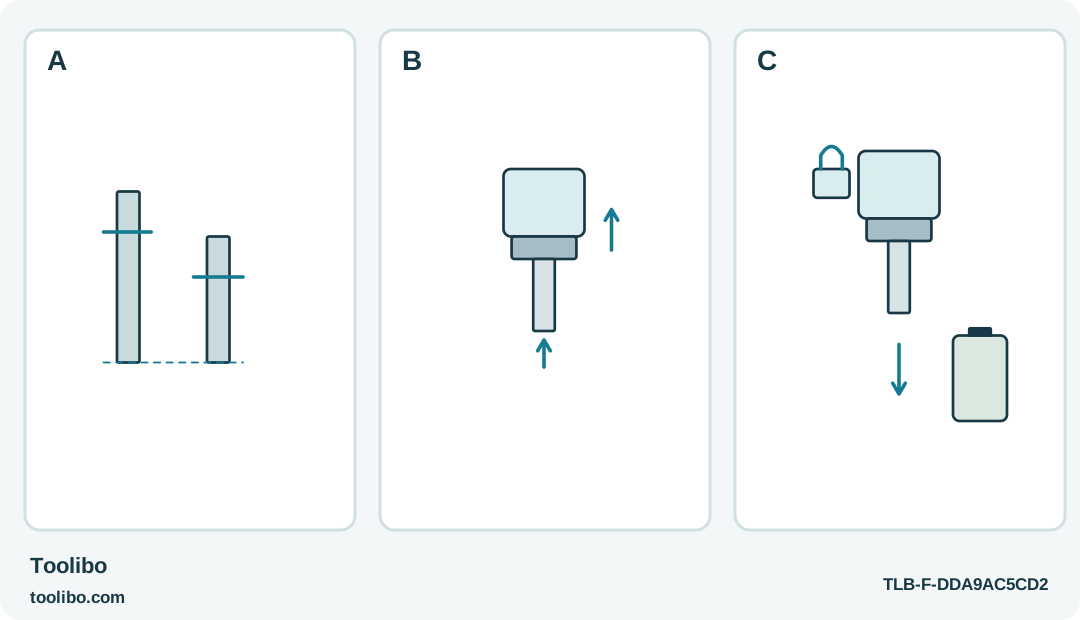
Two different bit lengths share a baseline but have separate mounting markers, followed by sleeve insertion and a gentle retention-check arrow.
A
Check the exact DF012D mounting diagram. Its mounting dimensions do not specify overall bit length.
B
With lock B set and battery removed, insert the compatible bit and let the sleeve return fully.
C
Use a gentle pull check before restoring power; do not force or partially seat an incompatible shank.
A long working tip can still have the wrong retained section; compare the mounting features before checking whether the sleeve returns and holds it.
Distinguish tip fit from holder fit
A bit has two separate jobs. Its working tip must fit the screw recess, and its shank must fit the screwdriver’s holder. Getting one right does not prove the other. A tip can engage a screw beautifully while an unsuitable shank fails to lock securely in the tool.
For the US Makita DF012D, check the bit dimensions and installation arrangement specified for that exact holder. The DF012DSE package name does not create a different device or make every bit included with another Makita kit suitable.
Begin before the tool is brought to the furniture. Put the driver and candidate bits on a clear bench, identify any worn or damaged accessories, and separate them from the ones intended for use. Do not use a screw as a fixture to hold a loose bit while testing the holder.
Remove the battery before handling the sleeve
Release the operating control, set the lock lever to B and remove the battery before fitting or removing a bit. This makes the accessory check a deliberate setup task rather than a movement performed with a live motor close to your fingers.
Allow a bit that has become hot to cool before touching it. Inspect the accessible shank for obvious wear, burrs or contamination that could prevent its intended seating. Do not grind a bit, hammer it into the holder or add an improvised insert to compensate for the wrong dimensions.
The US DF012D mounting drawing distinguishes a 12 mm end section for the illustrated double-ended bit and a 9 mm end section for the illustrated single-ended bit. These are mounting dimensions, not overall bit lengths. Compare the actual shoulder and end against that drawing; a shared quarter-inch description is not a complete mounting specification.
Fit, release and check in that order
Use the holder sleeve as instructed, insert the correct bit fully and allow the sleeve to return to its normal position. The sleeve should not need to be held back or taped in place for the bit to appear usable.
Check retention by a controlled pull on the bit, keeping its sharp working end away from your skin and surroundings. The point is to confirm that it does not come free through ordinary handling, not to subject the holder to a violent load. If the bit pulls out, repeat the identification and seating checks with the battery still removed.
Do not continue with a bit that only seems secure when pushed against the screw. That arrangement can fail as soon as you withdraw the tool, change orientation or pause between fasteners. A holder that will not retain the correct undamaged bit needs proper service rather than more operating pressure.
Check alignment as well as retention
After correct installation, bring the unpowered tool to a representative screw and check the working tip. It should engage the recess squarely without requiring a sideways approach. A securely retained wrong tip is still the wrong accessory.
Once setup is complete, refit the correct battery and use gear 1, low speed, with a conservative numbered clutch setting for a controlled trial. Change gear only with the motor stopped. Keep the drill symbol separate from the numbered clutch positions; it is not an extra careful-tightening setting.
Start the sample screw squarely and observe both the bit and the joint. Stop if the bit wobbles abnormally, slips from the recess or the holder behaves unexpectedly. Do not try to steady a rotating bit with your fingers or continue driving to discover whether the movement will disappear under load.
Finish the session with the same separation of tasks
Remove the battery again before changing bits or inspecting the holder after use. Keep the accessible area clean according to the tool’s owner-care instructions. Do not probe inside it with a pointed object or introduce an unapproved lubricant to make an unsuitable bit fit.
Replace a damaged accessory rather than leaving it in a common bit box without identification. If different tools use different mounting arrangements, store their specific parts separately. That small organizational step prevents a future user from assuming that the nearest hex bit is automatically compatible.
The useful result of this check is a complete chain: correct shank, normal sleeve return, secure retention, correct screw-tip fit and a controlled working trial. None of those checks substitutes for the others, and the battery belongs off the tool whenever your hands are carrying out the fitting process.
Models referenced