
Simple switching needs a visible endpoint
A generic trigger silhouette, contrasting single- and double-ended bit shapes, and a magnified screw seat explain the control limits.
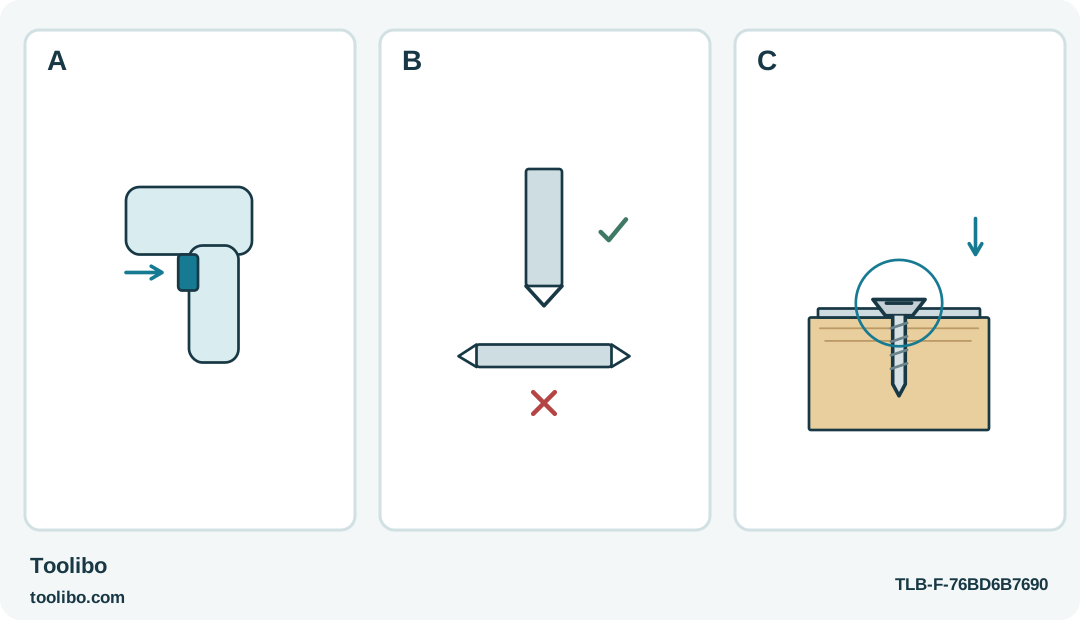
A
Release the trigger to stop and use center-lock for setup; no numbered clutch is assumed.
B
Use a compatible single-ended bit; the BDCS20 excludes double-ended bits.
C
Watch the seat and release promptly. A stall is a stop-and-inspect event, not permission for repeated bursts.
With no numbered clutch to choose, the useful stopping cue is the visible condition of the fitting, not a motor stall.
Choose a fitting the tool can approach openly
A loose handle or a small non-electrical fitting can be a reasonable job for the BLACK+DECKER BDCS20 when the screw, supporting material and intended assembly are known. Begin by identifying why the fitting is loose. A screw that has backed out is different from a broken bracket, a stripped hole or a cracked furniture panel.
Support the part so that tightening pressure will not tip or twist it. Keep the fastener visible and inspect the other side where accessible. If a longer replacement screw could emerge through a thin panel, do not choose one merely because it seems more likely to hold.
This guide concerns the US BDCS20 device associated with the BDCS20C listing. It does not cover an electrical faceplate, energized equipment, a structural connection or a load-bearing furniture repair. When the surrounding material is damaged, solve that problem through the appropriate repair method instead of using motor force to hide it.
Lock off and select a single-ended bit
The central position of the forward/reverse slider locks this tool off. Use that position before fitting a bit or adjusting the work. Disconnect the charger before use; the charging lead is not a corded operating supply.
The hex spindle takes an appropriate single-ended bit. Double-ended bits are excluded for this model. Match the working end to the screw recess rather than assuming that the bit already in the tool is suitable. A tip that rocks, bottoms incorrectly or contacts only the edges is a poor choice even if it can turn the screw a little.
Insert the bit correctly and check its engagement with the motor still locked. Do not use the screwdriver as a lever to move the fitting into place. Bring the parts into alignment separately, and keep any small loose pieces contained so they cannot fall into the joint while you work.
Establish the correct finished position
A simple trigger-operated driver does not give you a universal tightening number. Look at the fitting’s instructions and construction. A screw head may bear on a metal plate, a washer or a countersink; those surfaces should not be crushed simply to make the screw feel tighter.
If the screw was removed for inspection, start it squarely and make sure it follows the intended thread or prepared hole. Do not force a screw that immediately leans or binds. On a furniture assembly, an incorrect screw can appear to start normally and then stop when its shoulder or length meets something the original screw did not.
Where practical, try a matching screw in representative spare material before working on a visible finish. Keep that trial separate from the finished fitting. Its purpose is to establish the feel and likely stopping point, not to prove a structural rating or justify a different fastener.
Drive in a straight line and stop promptly
Choose the required direction only when the bit is seated and the work is stable. Press the trigger deliberately, keeping the tool aligned with the screw. As the head approaches its seat, release and inspect rather than continuing until the motor can no longer turn.
If the motor stalls, release the trigger immediately. Do not pulse the switch against a stuck screw. A stalled motor tells you that the present load cannot be driven normally; it does not identify whether the problem is the battery, the screw, an obstruction or the material.
Center-lock the tool before checking the cause. Look for a wrong bit, damaged recess, misaligned fitting, unsuitable screw or material that has started to split. Remove the tool from the recess without prying sideways. If the job needs a different tool or repair method, change the plan instead of repeatedly trying the same powered action.
Judge the repair by the fitting
After tightening, check that the fitting sits properly and works through its ordinary movement. A handle should not rock, and a bracket should not be bent into a new shape by its screw. If the screw turns without holding, further driving is not a repair for the damaged connection.
Keep the tool off while clearing the bench. Wipe the exterior as instructed and keep moisture out of the housing. Do not carry it loose in a pocket, where a control can be pressed or a bit can injure someone. Store it with the center lock engaged and its charging equipment identified.
For charging, follow the instructions supplied with the exact tool and charger rather than a generic elapsed-time claim. If those instructions are unclear, obtain the manufacturer’s guidance. Do not open the internal battery assembly or treat disposal instructions as a maintenance procedure.
Models referenced