
A folded foot supports a light cardboard divider
A cardboard partition with a folded foot sits flat on an insert base; a second section contrasts an upright edge held only by a thick adhesive mound.
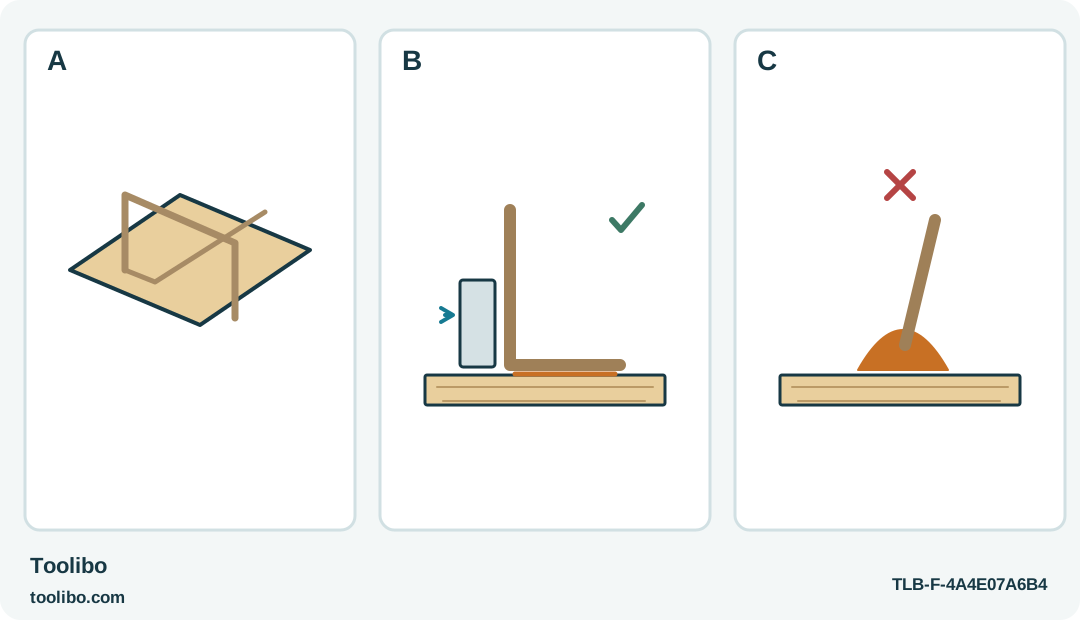
A · Flat folded foot
Dry-fit the foot against the base before using adhesive.
B · Supported alignment
Keep the low divider upright while the joint cools.
C · Reject the glue mound
A strip balanced on its thin edge is not corrected by a large bead.
Generic nonstructural organizer geometry. A wide contact foot is a construction choice, not a rated strength claim or a carrying handle.
Make an organizer, not a stronger box
A few low cardboard partitions can keep an empty desktop tray from becoming a pile of loose stationery. Their job is to separate small contents. They must not support the tray, act as carrying handles or hold heavy objects above one another. Start with a sound tray and an insert design that remains easy to remove if the experiment is unsuccessful.
This example uses the German-listed STEINEL GlueMatic 1007, article 082185, on its matching rated supply. The 1007 and the similarly named 1007-LT are different tools. The ordinary 1007 is not a low-temperature gun with a hidden setting, and sticks chosen for the LT must not be substituted just because both names look familiar.
Choose clean, dry cardboard that you can inspect on both faces. Keep staples, plastic laminates, unknown coatings and contaminated packaging out of this project. Prepare the shapes with suitable nonpowered cutting tools before the glue gun is heated; cutting instructions are separate from this gluing session.
Arrange the sections around real contents
Lay the empty tray on the bench and sketch the spaces you actually need. A narrow lane may work for pencils but trap a bulky eraser. Try the real objects while the pieces are still loose, then remove them before gluing. This gives the layout a useful purpose instead of copying a grid that only looks tidy in a drawing.
Keep partitions low enough that the contents can be grasped without pushing hard against the divider. A short section with a folded foot gives you a controllable contact area. The foot should lie flat on the insert base, without a spring that tries to lift it while the glue cools. Do not rely on a large mound of adhesive to hold an upright strip on its thin edge.
Dry-assemble the complete layout and check that it slides into and out of the tray without wedging. Mark each position on the insert base. If the base curves or the folds pull it out of square, correct the cardboard design before opening the adhesive package.
Prepare a sample and the hot-tool resting place
Set the 1007 on its support on a protected, nonflammable work surface. Route the lead where it cannot be snagged by the tray or pulled by a passing person. The nozzle needs a clear resting area even after the tool is unplugged. Keep paper offcuts away from that area rather than letting them accumulate underneath the hot end.
Select recommended original sticks for the gun and materials. Feed them from the rear as instructed; do not add liquid glue or force an incorrect diameter into the opening. Let the gun heat properly before feeding. Follow the warm-up instructions supplied with the actual unit, then test for normal flow gently rather than forcing the feed because a timer has finished.
Bond two matching offcuts using the intended folded-foot construction. Apply gently to one surface, position the pieces promptly and support the angle while the adhesive cools. Check that the cardboard has not distorted and that the foot has broad contact instead of resting on a single thick lump.
Assemble one divider at a time
Put the insert base on the protected work surface, not inside a tray full of belongings. Work from an easy reference edge so that later pieces do not block access to the joint you are forming. Rehearse where the gun will rest before reaching for the next strip.
Apply the amount that worked on the sample, align the foot with its mark and keep the divider upright with a cool, suitable support. Hands must remain clear of the glue line. Avoid pressing hot glue through thin cardboard; a protected work surface is useful precisely because the material is not a reliable thermal barrier.
Allow the first section to hold its position before adding another. Check the layout with a small square or a cold reference card rather than trying to straighten several warm joints at once. If a strip moves as the adhesive sets, stop and let it cool. Repeatedly squeezing more glue around it usually makes the partition bulkier without restoring accurate fit.
Inspect the insert under ordinary use
After cooling, lift the insert by its base and place it in the tray. It should sit flat, with no raised bead forcing the base into a curve. Put back a few light objects and check whether their normal placement pushes on the partitions. A compartment that requires force is the wrong size; it is not a reason to build a thicker glue fillet.
Reject loose feet, torn cardboard and joints that separate during light handling. Keep the insert away from moisture and hot objects, and never use a divider as a lifting point. Disconnect the gun, leave it supported until fully cool, and do not pull the remaining stick backwards. Remove stray adhesive from the surrounding work only once cold; internal cleaning or opening the housing is outside this project.
Models referenced